5C User Manual
About this manual
This manual explains how to use the 5C foster-care agency software: where to click, what each screen does, what happens when you save, how to fix mistakes, and how to get back to where you were.
It is written for staff of a Texas child-placing agency who already know foster care, the minimum standards, DFPS and T3C. It explains the software only. It does not explain foster-care practice or the rules themselves.
- Version. Written for 5C version 4ecda82 (the general tester version). It matches the agency release numbered 2026.10.11, plus later small changes: the update message on the admin pages, the last "EBI log" wording now reading "EBI", and two-step sign-in locked on. Screens may change in later versions. If a screen does not match what you read here, the screen is right.
- Updates. 5C tells administrators and supervisors when a newer version is out, and the agency installs it when convenient. See Updating 5C.
- Passkey sign-in. In every agency's copy of 5C, two-step sign-in is always on; it can't be turned off. 5C asks for a passkey after your password, and an administrator login is kept apart from casework. Only the public tester copy (made-up data) and a developer's copy that just one computer can reach run without it: there, signing in takes only the password, and the administrator login can also open the everyday screens. Where this makes a difference, the manual says "passkey sign-in off".
- License. 5C is free for an agency to use, and to change, for its own work. The agency's staff, or a contractor or IT provider it hires, may install and look after it, and a contractor may charge for that work, but not for 5C itself. 5C may not be sold, resold, passed on to others, or offered to others as a hosted service. The full terms come with 5C; for anything they do not cover, contact 5C Systems through 5c-systems.com.
- Examples. Names, homes and numbers in the pictures and examples come from made-up demonstration records. None of them is a real child, family or employee.
- On-screen labels. Words in bold are buttons, links and menu items exactly as the screen shows them. Words in "quotes" are the labels beside boxes you fill in. Some labels include a rule number; where they do, this manual quotes the label exactly as it appears.
- Searching. Use the search box at the top of this page. It hides the sections that do not contain your words and highlights the matches. Clear the box to see everything again.
- Down the road, there will also be an optional AI-assisted version that runs on its own dedicated computer. That will be a paid add-on, and we'll share details when it's ready.
How the steps are written
Each task starts with a short What this is for line, then numbered steps. Each step is one action. Where the step depends on your role, the manual says so.
Words this manual uses
- Record — everything 5C keeps about one child, one home, one referral or one employee.
- Page — one screen in your web browser.
- Tab — a labelled strip along the top of a record that switches what part of the record you see, without leaving the page.
- Box — a place you type or choose something.
- Dropdown — a box that opens a list to pick from.
See the Glossary for more.
Part 1 — Getting started
Logging in and out
What this is for: opening 5C with your own account, and closing it safely when you are done. With passkey sign-in, signing in takes two things: your password, and a passkey on a device you have with you.
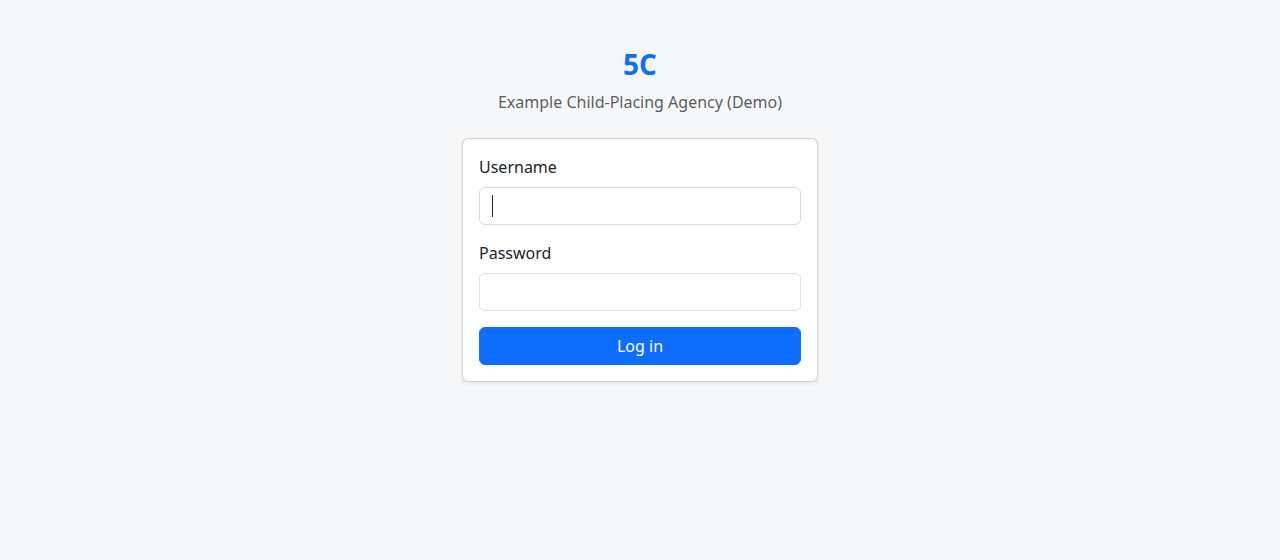
Log in
- Open your web browser and go to the address your agency gave you for 5C. Type it exactly as given: passkeys work only at that address.
- In "Username", type your username.
- In "Password", type your password.
- Click Log in.
- If your agency has passkey sign-in turned on, 5C now asks for your passkey. The first time, follow Set up your passkey. After that, follow Sign in with your passkey. Nothing else in 5C opens until this step is done.
Where you land depends on your role:
- Agency Staff land on the Dashboard.
- Administrator lands on the admin side when passkey sign-in is on, and on the Dashboard when it is off. See Administrator and staff logins.
- Foster Parent lands on My home, the foster-parent portal. See The foster-parent portal.
If you followed a link to a particular page and were asked to log in first, 5C takes you to that page after you log in. This includes links to admin pages: there is one sign-in page for everyone.
If you see "Your username and password didn't match. Please try again.", check that Caps Lock is off and type both again. 5C has no "forgot password" button. If you cannot get in, ask an administrator to set a new password for you (see Set or reset a password).
Log out
- Click Log out at the top right of any page. Your name appears just to the left of it.
You return to the login page.
Automatic log-out
5C logs you out on its own:
- when you close the browser, and
- after a period with no activity (one hour, unless your agency has set it differently).
Anything you had not saved is lost. Save as you go, and lock your screen when you step away.
When an administrator sets a new password for your login, or resets your sign-in device, 5C also signs your login out everywhere it was open.
Set up your passkey (first sign-in)
What this is for: the first time you sign in with passkey sign-in on, choosing the device that will vouch for you from then on.
A passkey is kept by a device you have with you: this computer (Windows Hello on Windows, Touch ID on a Mac), your phone, or a USB security key. The device proves it is yours without sending any secret to 5C.
- Log in with your username and password (see Log in).
- The page "Set up a passkey" opens. Read its two cards: "This computer can vouch for you" (best for a computer that is yours) and "Use a USB security key" (best for a shared computer, or one with no PIN set up).
- Click Set up a passkey.
- Your browser asks which device to use. Choose this computer, your phone or your security key.
- Do what the browser or device asks: enter your PIN, use your fingerprint or face, or plug in the key and touch it.
When the passkey is saved, 5C opens the page you were going to, or your starting page.
- Until you have set up a passkey, the menu is empty except Help, and every other page sends you back here. Log out at the bottom of the page leaves without setting one up.
- If you see "This browser can’t set up a passkey for 5C at this address.", 5C has been opened at the wrong address. Ask your administrator.
- If you can, set up a second passkey too (see Add another passkey). With only one, losing it means an administrator has to reset your login before you can sign in again.
- Foster parents see "If your phone or computer is lost, call the agency."
Sign in with your passkey
What this is for: the second half of every sign-in once you have a passkey.
- Log in with your username and password (see Log in).
- The page "Use your passkey" opens, saying "Your password was right."
- Click Use my passkey.
- Your browser shows the passkeys it can use. Pick the one you set up for 5C.
- Do what the browser or device asks: PIN, fingerprint, face, or touching the key.
5C opens the page you were going to, or your starting page.
Every new sign-in asks for the passkey again. There is no "remember this computer". If you see "This browser can’t use a passkey for 5C at this address.", ask your administrator.
Add another passkey
What this is for: a second device, such as a USB security key kept in a drawer, so that losing one device does not lock you out.
- Sign in as usual, with your password and passkey.
- Click Add a passkey at the top right, beside Log out. On the admin side it is a link beside View site.
- If 5C asks for your passkey first, use the one you already have.
- The page "Set up a passkey" says how many passkeys your login already has.
- Click Set up a passkey.
- Choose the new device and do what it asks.
5C returns you to your starting page. I’m done leaves the page without adding one.
Add a passkey shows only when passkey sign-in is on.
If you lose your passkey device
What this is for: getting back into 5C when the computer, phone or key that holds your passkey is lost, broken or replaced.
- Tell an administrator straight away. Foster parents: call the agency.
- The administrator uses Reset sign-in device on your login (see Reset someone's sign-in device). This removes every passkey on your login and signs it out everywhere.
- Log in with your username and password.
- 5C asks you to set up a new passkey. Follow Set up your passkey.
The administrator has to be sure it is really you who signs in next. There is no code by email or text message, and no recovery code.
If you are the agency's only administrator and have lost your only passkey, see A backup passkey for a single administrator: it ends with a last resort for whoever runs the computer 5C is on.
The top menu
What this is for: moving between the main areas of 5C.
The blue bar across the top of every page is the menu. Click 5C at its left end to go back to your starting page (the Dashboard for staff, My home for foster parents, and the admin side for an administrator login when passkey sign-in is on). On a narrow screen or phone the menu folds away behind a button with three short lines; tap it to open the menu.
The menu shows only what your role can use:
| Menu item | Administrator | Agency Staff | Foster Parent | Chapter |
|---|---|---|---|---|
| Administration | Yes (passkey sign-in on) | — | — | The admin side |
| Dashboard | Only with passkey sign-in off | Yes | — | Dashboard |
| Children | Only with passkey sign-in off | Yes | — | Children |
| Referrals | Only with passkey sign-in off | Yes | — | Referrals |
| Credentials | Yes | Yes (read only) | — | Credentials |
| Homes | Only with passkey sign-in off | Yes | — | Homes |
| EBI | Only with passkey sign-in off | Yes | — | EBI |
| EBI program | Yes (passkey sign-in on) | — | — | The agency's EBI program setting |
| Requirements | Only with passkey sign-in off | Yes | — | Requirements |
| Reconciliation | Only with passkey sign-in off | Yes | — | Reconciliation |
| Employees | Only with passkey sign-in off | Yes | — | Employees |
| Reports | Yes | Yes | — | Reports |
| Billing | Yes | — | — | Billing |
| My home, Documents, Household, Training | — | — | Yes | Portal |
| Help | Yes | Yes | Yes | This manual, in a new browser tab |
With passkey sign-in on, an administrator login's menu is Administration, Credentials, EBI program, Reports, Billing and Help. With it off, the administrator login has every staff item plus Billing.
Help is always the last item in the menu. While you are setting up or using your passkey, it is the only item.
At the right end of the bar are your name, Add a passkey (only when passkey sign-in is on; see Add another passkey) and the Log out button.
Administrators and supervisors may also see a blue or red strip just under the menu saying a 5C update is available (administrators see it on the admin side too). See Updating 5C.
Some agencies' copies show a coloured strip above the menu (for example a test copy labelled as holding made-up data). It is a reminder of which copy you are using; it does not change how anything works.
Roles
What this is for: knowing what your account can and cannot do.
Every login has exactly one role. An administrator sets it (see Users and roles).
- Administrator — the admin side ("5C administration"): logins, agency settings, employees and their personnel files, billing and data exports. Also Reports, Billing, the agency's EBI program setting (see The agency's EBI program setting), and adding and editing agency credentials and Logic Models and adding SSCCs. With passkey sign-in on, an administrator login does not open children, homes or referrals; see Administrator and staff logins. With it off, it can also do everything Agency Staff and supervisors can.
- Agency Staff — all the day-to-day casework screens: children, referrals, homes, visits, service plans, authorizations, documents, EBI, the read-only Employees list, and Reports. An administrator can mark a staff login as a supervisor, which adds the approving and removing actions listed in Supervisors.
- Foster Parent — only the portal for their own home: its credentials, documents, household and training. A foster parent never sees any child's record or any other home, and never enters or sees an EBI incident.
Your role is not your job title. Job posts (child placement staff, treatment director and so on) belong to the employee record, not to the login. See Employees (admin side).
"This part of 5C isn't available to your account"
If you open a page your role cannot use — for example by following an old link — you see a page with this heading. It tells you which account you are signed in as and your role.
- Click Back to the dashboard (staff), Back to my home (foster parents) or Back to administration (administrator logins) to return.
- If you need the action, ask a supervisor or an administrator to do it for you, or to change your login.
An administrator login that opens a child's record, a home or a referral while passkey sign-in is on sees "This is an administrator login, and administrator logins don’t open children’s records, homes or referrals." Log out and sign in with your everyday staff login.
A staff login that is not a supervisor and reaches a supervisor's action by an old link sees this page saying "This is a supervisor’s action — approving, finalizing or removing a record." It names who can do it: staff logins marked as supervisors, and administrator logins too when passkey sign-in is off. Ask a supervisor, or ask an administrator to mark your login as a supervisor.
A foster-parent login that has not yet been linked to a home also sees this page, with an explanation. The fix is an administrator setting, described in Foster-parent logins.
Administrator and staff logins
What this is for: knowing which login to use when passkey sign-in is on.
- An Administrator login is for administration: the admin side (settings, logins, the agency's credentials, data exports and Billing), and Credentials and Reports in the menu. After sign-in it starts on the admin side. View site at the top of the admin side opens the Reports page.
- It does not open children's records, homes or referrals. If it tries, 5C refuses and writes the attempt to the security log (see Security events).
- A person who does both administration and casework has two logins: an everyday Agency Staff login for casework, and a separate Administrator login. An administrator records the two as an account pair (see Account pairs).
- The two logins must have different passwords. An administrator password must be at least 12 characters.
- To switch, click Log out, then sign in with the other login, with its password and passkey.
With passkey sign-in off, the administrator login also opens every staff page, as it always did. The password rules apply either way.
Supervisors
What this is for: knowing who can approve, finalize and remove records.
A supervisor is an Agency Staff login that an administrator has marked "Supervisor" (see Make a staff login a supervisor). Only a supervisor can:
- finalize an Annual Credential Report run;
- credential a home for a package, and End a home's credential;
- record and approve a home's screening or addendum;
- record the agency's verification date for a home;
- Remove a contact or case-team member;
- Delete a child's document or Remove a home's document;
- Settle a disputed authorization;
- close, reopen or void an EBI incident (see Supervisor close, reopen and void);
- record that an EBI quarter was filed in CLASS, and correct a recorded filing, with a reason (see The quarterly report).
Other staff do not see these buttons. Where a form would be, they see a short note instead, for example "Credentialing a home is a supervisor’s action." Rest the pointer on its help mark to read who can do it.
A supervisor finalizes a report run from Reports → Review and finalize runs (see Report runs).
Every supervisor action is written to the security log. An employee's personnel files are not a supervisor's: only an administrator removes them, on the admin side. With passkey sign-in off, the administrator login can also take every supervisor action.
Reading a 5C page
What this is for: knowing what the small marks, colours and notes on 5C pages mean.
Help text and hover notes
- Grey help lines under a box explain what to put in it, what a blank means, and anything special that happens when you save. Read them the first time you use a form.
- Hover notes. Some labels, badges and dates show more explanation when you rest the mouse pointer on them (on a touch screen, press and hold). For example, the dates in the "Clocks" column on the Children list name the rule they are counted from.
- Question marks. A small ? beside a heading, box or step shows a plain explanation when you rest the pointer on it, or move to it with the Tab key. The EBI pages have one beside almost every box (see EBI).
- Badges are small coloured labels such as Active, Full, Interim, Draft, not yet checked or provisional. They describe the state of a row. They are not buttons.
- Breadcrumbs. The small line of links above a page title (for example Children / child's name / Edit) shows where you are. Click any link in it to go back up.
Counts, not verdicts
Many 5C screens print a count or a number of days beside the rule's number, for example "461 days since it started (the rule says completed within 15 …)". 5C deliberately does not decide whether you are compliant. It shows the dates and lets a person judge. Lists headed "Needs attention" and similar are worked out fresh each time you open the page; nothing on them is cleared by reading it. A row leaves such a list only when somebody records the missing thing on the record it belongs to.
Messages after you save
After most saves a coloured message appears at the top of the page:
- Green — saved. It usually repeats what was saved, for example "Placement added — …".
- Blue — information.
- Yellow — saved, but there is something to know (for example a document date that 5C guessed from the file name, or a reconciliation recorded as disputed).
- Red — not saved. The form is shown again with the problem marked in red under the box concerned. Fix it and save again.
Click the small × on a message to close it.
Forms that open in place
On the tabs of a child's record, many buttons (Add person, Add medication, Edit, Add placement and so on) open a small form right on the tab instead of a new page. Cancel closes the form without saving. Save or Save changes saves and closes it. The rest of the page stays where it was.
Dates and blanks
- Dates are shown month/day/year. Date boxes open a small calendar, or you can type the date.
- A blank end date usually means "still current" or "no end date". The help line under each box says which.
- A blank start date is usually "not known", not "in the future".
- Times are Central time.
Change history
5C keeps every earlier version of what you change. The Overview tab of a child and the Change history section of a referral show the latest changes: who, when, and the old and new value. "Every correction is kept — the original value is never lost." Administrators can see the full history of any record on the admin side with the History button (see The admin side).
The Dashboard
What this is for: a first look, each morning, at your caseload and at the things that need someone's attention.
To open it, click Dashboard in the menu (or 5C at the left).
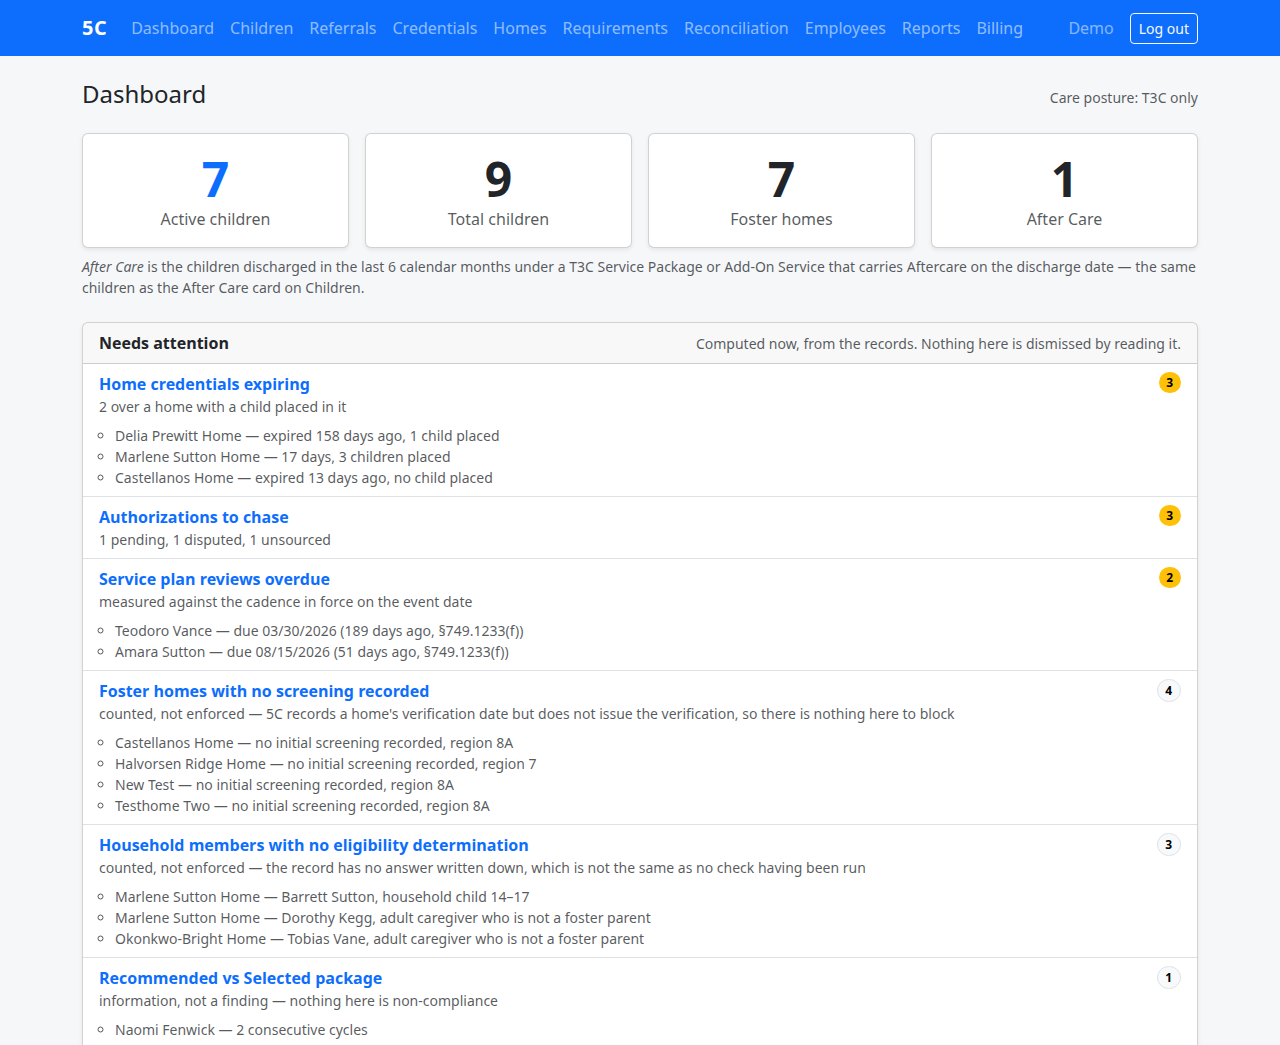
From top to bottom:
- Care posture — top right. Shows the agency's setting: "Legacy only", "T3C only" or "Legacy and T3C". See Care posture.
- Count cards — "Active children", "Total children", "Foster homes" and After Care. Click After Care to open the After Care list on the Children page.
- Needs attention — worked out now from the records. Each heading is a link to the page where the items are fixed. The number at the right is how many items there are. Up to a few examples are listed under each heading. The headings that can appear are: - Home credentials expiring — opens the expiring credentials list. - Authorizations to chase — opens the Reconciliation queue. - EBI follow-up steps due — required EBI steps that are overdue or due within 24 hours; opens the EBI page. See Follow-up steps and due times. - Service plan reviews overdue — opens the Children list. - Foster homes with no screening recorded — opens the Homes list. - Household members with no eligibility determination — opens the Homes list. - Recommended vs Selected package — opens the Recommended vs Selected page.
If nothing is outstanding you see a sentence saying so. 5C does not compute the required frequency of monthly child contacts, so they never appear here.
 4. Cadence rollup — one row per active, verified home: last supervisory visit, number of visits, visits inside the home, unannounced visits, last annual evaluation, and the next verification anniversary. The rule's number is printed in each column heading for comparison. Click a home's name to open its supervisory visits, or annual evaluations under it to open those.
5. Package credentials and homes — one row per T3C package the agency holds today, with how many active, verified homes are "Credentialed", "Credential expired", "Not verified for the required Treatment Services" or "Not credentialed". Click a package name to open the capability query for it.
6. View children and Add child buttons at the bottom.
4. Cadence rollup — one row per active, verified home: last supervisory visit, number of visits, visits inside the home, unannounced visits, last annual evaluation, and the next verification anniversary. The rule's number is printed in each column heading for comparison. Click a home's name to open its supervisory visits, or annual evaluations under it to open those.
5. Package credentials and homes — one row per T3C package the agency holds today, with how many active, verified homes are "Credentialed", "Credential expired", "Not verified for the required Treatment Services" or "Not credentialed". Click a package name to open the capability query for it.
6. View children and Add child buttons at the bottom.
One-time agency setup
What this is for: the things an administrator does once, before staff start entering casework. Most of it is on the admin side.
Do these in order:
- Fix 5C's address before anyone sets up a passkey. See Setting up the computer that runs 5C.
- Sign in as the first administrator and set up its passkey, then a backup one. See A backup passkey for a single administrator.
- Set the agency's details and care posture. See Agency settings and Care posture. Set the agency's EBI program too: see The agency's EBI program setting.
- Record the agency's own T3C credentials (if the agency operates T3C). Menu Credentials. See Credentials.
- Add the SSCCs that send referrals. Menu Credentials, section "SSCCs". See Add an SSCC.
- Check package requirements. Menu Requirements shows which Treatment Services each package needs a home to be verified for. Packages not yet set up there cannot have homes credentialed for them. See Requirements.
- Add employees and their training, and create staff logins. Mark the staff who approve and finalize as supervisors. Give anyone who also administers a separate administrator login, recorded as an account pair. See Employees (admin side), Supervisors and Account pairs.
- Add the foster homes, then on each home record its verification date, Treatment Service verifications, screening, household and credentials. With passkey sign-in on, this is done on a staff login, and the verification date, screening and credentials need a supervisor. See Homes.
- Create foster-parent logins and link each to its home. See Foster-parent logins.
- Billing (optional). Enter placement rates before generating registers. See Billing.
The first administrator's password. The first administrator login is made while 5C is installed, by typing a username, an email address and a password. 5C does not check the password's length at that point. Set it to 12 characters or more yourself, and if you are asked "Bypass password validation and create user anyway?", answer N. After that, 5C checks for 12 characters wherever an administrator password is set.
Setting up the computer that runs 5C
What this is for: a short note for whoever installs 5C, so that passkeys keep working.
- One computer. Open 5C at
http://localhost:8000, typed exactly like that. Do not use the number address127.0.0.1, even though it reaches the same place: passkeys do not work there. - Never change the name in the address after people have set up passkeys. Each passkey belongs to the name it was set up on (here,
localhost). If the name changes, every passkey stops working, and an administrator has to reset everyone's sign-in device. - Do not change the port either (the number after the colon, here
8000) unless whoever set up 5C changes the matching settings at the same time. If they do not match, nobody can sign in with a passkey. - More than one computer needs a secure address (one that starts with
https://) on a fixed name. Passkeys do not work from other computers over a plain address. - 5C answers only on its own computer until it is told otherwise. For other computers to reach it, whoever sets it up must list, in 5C's settings file, every name people will type to reach it. A demo copy is opened on its own computer at
http://localhost:8000. - Two-step sign-in can't be turned off. 5C will not start if its settings try to turn it off, except on a developer's copy that only its own computer can reach.
Care posture
What this is for: telling 5C which payment system the agency works under, so that it offers the right screens.
The care posture is set on the admin side, on the agency's organization record, in the "Care posture" dropdown. It has three choices:
| Choice | What 5C offers next |
|---|---|
| Legacy only | New Service Level authorizations. No new T3C package authorizations, no new Add-On Services, no new T3C credentials. Billing registers invoice only Service Level days. |
| T3C only | New T3C Service Package authorizations and Add-On Services, agency and home T3C credentials. No new Service Level authorizations. Billing invoices only T3C days. |
| Legacy and T3C | Both, for an agency in transition. Billing invoices every authorized day. |
Important points:
- The posture decides what can be added next. It never changes or hides what is already recorded. Every earlier period stays readable and can still be ended or corrected.
- A child is authorized under one system at a time for any given day, whatever the posture.
- When moving from one system to the other, end each child's old authorization the day before the new one starts (see End an authorization), then record the new one.
- A new agency starts on Legacy only until an administrator changes it.
- The Dashboard shows the current posture at the top right.
Part 2 — The menu areas
The chapters in this part follow the top menu from left to right.
Children
What this is for: finding a child, adding a child, and keeping each child's record: contacts, authorizations, medical, service plan, emergency behavior interventions, monthly contacts, placements, documents and After Care.
Click Children in the menu.
The Children list
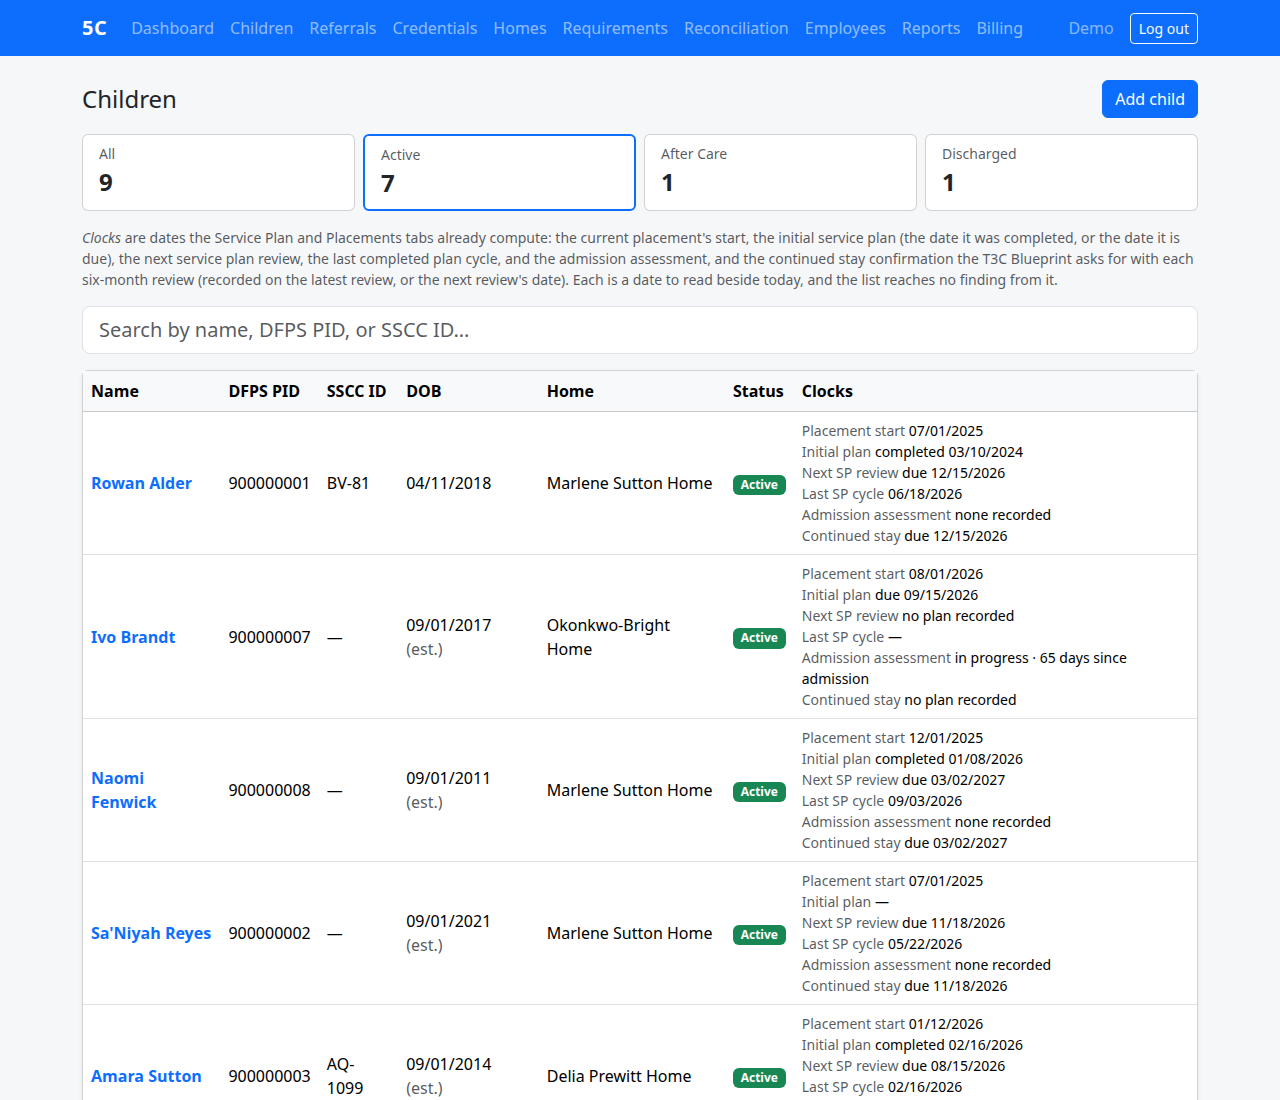
- Caseload cards across the top: All, Active, After Care and Discharged, each with a count. Click one to show only those children. The card you are on is outlined.
- Search box — "Search by name, DFPS PID, or SSCC ID…". Start typing; the list narrows as you type. Clear the box to see the whole caseload again.
- Table — "Name", "DFPS PID", "SSCC ID", "DOB", "Home", "Status" and "Clocks". Click a child's name to open the record.
- Clocks — dates that the Service Plan and Placements tabs already work out: "Placement start", "Initial plan", "Next SP review", "Last SP cycle", "Admission assessment" and "Continued stay". Rest the pointer on a clock to see which rule it is counted from. The list draws no conclusion from them.
- On the After Care card the columns change to "Discharge date", "Days since", "Package at discharge" and "Last contact".
- Add child — top right.
Add a child
What this is for: creating a new child record. (If the child came through a referral, accept the referral instead; it creates the record for you. See Accept a referral.)
- Click Children in the menu.
- Click Add child.
- Under "Identity", fill in "First name", "Middle name", "Last name", "DFPS PID", "SSCC ID" and "Client number". Only the first and last names are required.
- Under "Demographics & placement", fill in "Date of birth". Tick "DOB is estimated" if the date is not certain.
- Choose "Sex", "Race" and "Ethnicity".
- Leave "Status" on Active for a child in care.
- Under "Safety (Minimum Standards §749)", fill in "Allergies", "Chronic conditions" and "Restraint contraindications". Leave a box blank if there is nothing to record.
- Click Save.
5C opens the new record and shows "… added." The child does not have a home yet: you record where the child lives on the Placements tab (see Add a placement). The home shown on the record always comes from the open placement and is never typed in twice.
DFPS PIDs in the 9000000xx range are kept for demonstration records and are refused.
The child's record
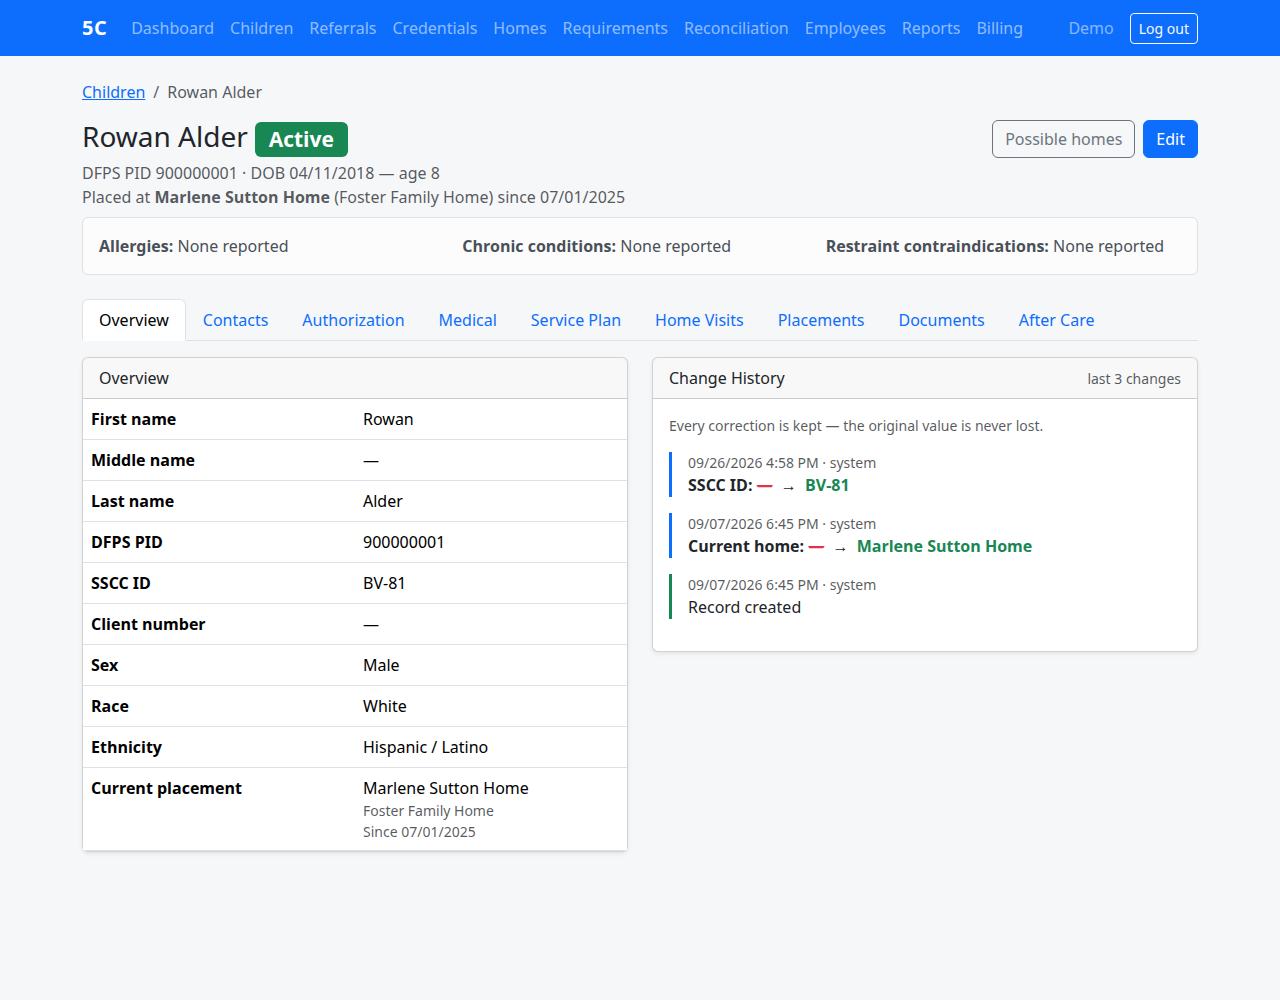
At the top of every child's record:
- Name and status badge (Active or Discharged).
- DFPS PID, date of birth and age, and where the child is placed and since when.
- Possible homes — see Possible homes for a child.
- Edit — change the child's identity, demographics, status or safety details.
- Safety banner — "Allergies", "Chronic conditions" and "Restraint contraindications". It turns yellow when any of them has something written in it. The same three items are on the Medical tab and on the Edit page; changing one changes all three places.
Below are the tabs: Overview, Contacts, Authorization, Medical, Service Plan, EBI, Home Visits, Placements, Documents and After Care. Click a tab to switch to it. Each tab loads when you open it ("Loading …" shows for a moment).
Links elsewhere in 5C sometimes open a record straight on a tab (for example "open it" on the Edit page opens the Placements tab).
Edit a child's details
What this is for: correcting a name, PID, date of birth, demographics, status or safety details.
- Open the child's record.
- Click Edit at the top right.
- Change what needs changing.
- Click Save. (Click Cancel to leave without saving.)
The old values are kept in the change history on the Overview tab.
Mark a child as discharged
What this is for: moving a child off the Active caseload after they leave care.
- End the child's current placement first (see End a placement).
- Click Edit on the child's record.
- Set "Status" to Discharged.
- Click Save.
Ending the placement does not change the status by itself, and changing the status does not end the placement. Do both. A discharged child appears on After Care if they left under a T3C package or Add-On Service that carries Aftercare, within the last six calendar months; otherwise on Discharged.
Overview tab
What this is for: a read-only summary of the child and their recent changes.
- Overview — the child's identity and demographics, and the current placement (home, type and start date).
- Change History — the last few changes: when, who, the item that changed, and its old and new values. "Every correction is kept — the original value is never lost."
To change anything here, use Edit at the top of the record.
Contacts tab
What this is for: the child's family and connections, and the professionals on the case team.
The tab has two parts.
Family & Connections — parents, siblings, relatives, fictive kin and significant adults.
To add a person:
- Click Add person.
- Choose "Relation" (for example Birth Parent, Sibling, Relative, Fictive Kin, Significant Adult).
- Fill in "First name" and "Last name".
- In "Relationship (free text)", describe the relationship in your own words, for example "maternal grandmother".
- For a parent only, choose "Parental rights (parents only)": Intact, Terminated or Unknown.
- If the person is another child in 5C (for example a sibling in care), choose them in "Also a child in 5C". Their name is then read from their own record, and a link to it appears.
- Fill in "Phone", "Email" and "Address" if known.
- Tick "Kinship verified" if that applies.
- Add "Notes" if useful.
- Click Add person.
Case Team — caseworker, attorney ad litem, guardian ad litem, CASA, medical consenter, therapist and others.
To add a case-team member:
- Click Add case party.
- Choose "Role", for example DFPS/SSCC Caseworker, Medical Consenter or Therapist.
- Fill in "Name", "Organization" and the contact details.
- Leave "Currently assigned" ticked for someone currently on the case. Untick it when they leave the case.
- Click Add case party.
To change a person or case-team member, click Edit on their row, make the change, and click Save changes.
To remove one, click Remove and confirm. Only a supervisor can remove a contact or case-team member (see Supervisors); other staff do not see Remove. When somebody simply leaves the case team, untick "Currently assigned" instead of removing them, so the record still shows who held the role.
The Medical tab's "Medical consent" box lists active case-team members with the Medical Consenter and Backup Medical Consenter roles. You manage them here.
Authorization tab
What this is for: recording what authorized the child's care, for which dates, and on what evidence — a legacy Service Level, a T3C Service Package, or a request still waiting for an answer.
The tab shows the Authorization timeline: every period in date order, with any gap between periods marked "Gap — nothing recorded". Each period shows:
- whether it is a "Legacy Service Level" or a "T3C Service Package", and its status (Active, Ended, requested and not yet received, or disputed);
- its dates, and what it authorizes;
- "Source" — what the agency recorded it from;
- when it was recorded and by whom, and how many days after its start date ("backdated … days");
- buttons: End (if it has no end date), Add-On (T3C periods), Reconcile, and Settle (only when disputed).
On the right is Recommended Service Packages, with an Add button, and a short "On today's date" summary of what is selected and what is recommended today.
At the top are three buttons: Record T3C package, Record service level and Record as pending. All three always appear; if the agency's care posture does not allow the kind you chose, 5C refuses it when you save, with a red message.
A child can only be authorized under one system for any given day, and periods may not overlap. To change from one period to the next, end the old one the day before the new one starts.
Record a T3C Service Package
- On the Authorization tab, click Record T3C package.
- Read the "Already recorded" list at the top. Your new period may not overlap any of them.
- Under "The period", fill in "Effective from".
- Leave "Effective to (blank = open)" blank if the period has no end yet.
- Fill in "Requested on" if you know when the agency asked for it.
- Check "Recorded on" (today, by default).
- Choose "Source", for example Service Package Confirmation Report or Caseworker, verbally, and describe it in "Source note" (for example "Confirmation Report dated 06/14/2026").
- Under "What authorized it", choose the "Selected Service Package".
- Optionally choose "Recorded against which recommendation". Left blank, 5C uses the recommendation in force on the start date.
- If the Selected package differs from the Recommended one, choose the "Override reason". For Child in non-paid care setting and Other, also fill in "Override comment".
- Click Record.
Record a legacy Service Level
- On the Authorization tab, click Record service level.
- Fill in "The period" as for a T3C package (steps 2–7 above).
- Choose "Authorized Service Level" and "Billing Service Level". Record both, even when they are the same.
- Fill in "Level determined by", for example the assessment vendor.
- Click Record.
Record an authorization as pending
What this is for: a child is placed and you have asked for an authorization, but nothing has come back yet. Recording it as pending lets 5C count the days you have been waiting.
- On the Authorization tab, click Record as pending.
- Fill in "Requested on" (this is what the waiting count runs from), "Recorded on", "Source" and "Source note". "Effective from" may be left blank.
- Click Record.
The tab then shows "Authorization requested, nothing received." and the child appears under "Requested, not yet received" on the Reconciliation queue. When the authorization arrives, record it with Record service level or Record T3C package. A pending row covers no days, so it does not block the new one. To take the pending row off the queue, an administrator changes its status on the admin side (Authorizations → Authorization periods). See Things this manual could not confirm.
End an authorization
- On the period, click End.
- Fill in "Authorized through" — the last day it covers.
- Click End authorization.
Add-On Services that run with the package end with it.
Add an Add-On Service
What this is for: recording an Add-On Service (for example Kinship Caregiver Support Services) on a T3C period.
- On a T3C period, click Add-On.
- Choose "Add-On Service".
- Fill in "Effective from".
- Leave "Effective to (blank = runs with the package)" blank unless it ends earlier. Tick "Ended early" if it did.
- Click Record Add-On.
Reconcile a received document
What this is for: a document arrived (for example a Service Package Confirmation Report) and you want to read it against what 5C has.
- On the period, click Reconcile. The page shows "What the agency recorded" beside a form for "What the document says".
- Choose "Document" (the kind of document) and fill in "Received on".
- If the document matches, tick "The document agrees with our record" and click Record. 5C shows "Confirmation recorded."
- If it does not match, leave the box unticked, fill in "Start date the document gives", "End date the document gives", "What the document says it authorizes" and a "Note", then click Record.
A disagreement marks the period as disputed and keeps both versions side by side; what you entered before is not changed. The child appears under "Received document disagrees with our record" on the Reconciliation queue. Correct your record if the document is right (record the correct period), or follow it up with the caseworker.
Settle a dispute
What this is for: once you have resolved a disagreement, taking the period off the disputed list (supervisor).
- On the disputed period, click Settle. Only a supervisor sees this button (see Supervisors).
5C shows "Marked settled. Every reconciliation event on it is kept." The period returns to Active (or Ended if its end date has passed). The record of the disagreement stays.
Record a Recommended Service Package
What this is for: keeping the dated series of packages the CANS assessor recommended, separately from what was selected.
- In "Recommended Service Packages", click Add.
- Choose "Recommended Service Package".
- Choose "Origin", for example CANS 3.0 Assessment or Provider-proposed, transition cohort.
- Fill in "CANS completed on" and the date the recommendation takes effect.
- Leave "Effective to (blank = in force)" blank for the recommendation now in force.
- Fill in where the agency got it from (source and note).
- Click Record.
Only one recommendation is in force at a time. If the new one replaces an open one, first edit the old one's end date to the day before (on the admin side) or record the new one starting after it.
Medical tab
What this is for: the child's safety details, who can consent to medical care, current and past prescriptions, and filed medical and dental reports.
The tab has four boxes.
Safety header — "Allergies", "Chronic conditions" and "Restraint contraindications", the same three as the banner at the top of the record.
- Click Edit beside "Safety header".
- Change the text.
- Click Save safety header.
Medical consent — the active Medical Consenter and Backup Medical Consenter from the Contacts tab. Click Manage on Contacts to change them.
Medications — what the child is prescribed. This is not a medication administration log; the foster home keeps that on the agency's form.
To add a medication:
- Click Add medication.
- Fill in "Name", "Strength / dose" (as written on the prescription) and "Prescriber".
- Fill in "Started on". Leave it blank if you do not know.
- Leave "Ended (leave blank if current)" blank for a current medication.
- Tick "Psychotropic" if it is one.
- Fill in "Side effects" and "Notes" if useful.
- Optionally choose a "Related document" already filed on the child's Documents tab.
- Click Add medication.
To record that a medication was stopped:
- Click Stopped on its row.
- Fill in the date it was stopped.
- Click Record it as stopped.
It moves from "Current" to "Stopped". To correct any medication, click Edit, change it and save.
Medical & dental reports — physician's and dental reports only.
- In "File", choose the file from your computer.
- Choose "Type": Physician's / Medical Report or Dental Report.
- Fill in "Document date", or leave it blank to let 5C suggest one from the file name.
- Fill in "Source" (for example the clinic) and "Notes (optional)".
- Click File it.
Other kinds of documents (evaluations, consents, therapy notes) go on the Documents tab. This list does not say whether an exam happened on time.
Service Plan tab
What this is for: the child's one continuing service plan — its contents, and every planning cycle (the initial service plan and each review), with its meeting, team, notices, signatures and copies.
The tab shows, from top to bottom:
- Next review due — the date, how far away it is, and the cadence it is counted from. Under it, the T3C "Continued stay confirmation" line where the agency's posture uses it, with a Record link.
- Initial service plan and every service plan review — one row per cycle, newest first. Each row shows the meeting, completed and effective dates, the date the plan had to be out to its recipients, and how many of the cycle's items are recorded (for example "15 / 16 recorded"). Click the cycle's title to open it. Record starts a new cycle.
- Preliminary service plans — for older admissions only (see below).
- Plan contents — the plan's sections and what is recorded in each, with an Edit link.
- Decisions not to review — with a Record link.
The buttons at the top are Record a cycle, Edit plan contents and Decision not to review.
Record a planning cycle
What this is for: recording an initial service plan or a review and update.
- On the Service Plan tab, click Record a cycle.
- Choose "Kind" — Initial service plan (offered when the child has none) or Review and update.
- Fill in "Scheduled meeting date".
- Fill in the date developed, date completed, effective date and date implemented, as far as you know them. You can add the rest later.
- Click Record cycle.
5C opens the cycle's own page.
The cycle page
The cycle page holds everything about one cycle. At the top are Edit dates, Review contents (reviews only) and Back to child.
- Dates — scheduled meeting, developed, completed and effective.
- Getting the plan out — the date by which the plan had to be out, counted from the scheduled meeting, and when it was recorded as out.
- Completeness — each item the cycle needs, marked Recorded or Absent.
- Shortfalls — anything missing, named but never blocked.
- Service planning team — participants, with Add participant.
- Meetings — with Record a meeting. A team may meet more than once for one cycle.
- Notice and responses — with Record notice.
- Copies provided — with Record a copy.
- Review contents — for a review, the ten review items, with Edit.
- Continued stay confirmation — for T3C reviews, with Record / Record confirmation.
Add a team member and their signature
- On the cycle page, click Add participant.
- Choose "Role" (for example Current caregiver, Child, Parent, Agency staff, Treatment professional …).
- For a professional, choose "Profession".
- Fill in the name and "Organization".
- Optionally link the person to the child's Contacts with "Case party" or "Relationship".
- Fill in "Invited on" and the date of participation.
- For the signature, fill in the signed date. Optionally the participant can also draw their signature on the "Participant — draw to sign" pad (see Drawn signatures).
- If a professional disagreed with part of the plan, fill in the date the issues were documented and the issues themselves. The disagreement must be dated on or before the signature.
- Click Add participant.
Record a meeting
- On the cycle page, click Record a meeting.
- Fill in "Meeting date" and, if useful, "Informed note".
- Tick the box that every team member was informed of this meeting's discussion, if that is so.
- Click Record meeting.
Record a notice
- On the cycle page, click Record notice.
- Choose "Recipient role" (Parent or Foster parent) and fill in "Recipient name".
- Fill in the date the notice was sent and choose "Method".
- Fill in "Response received on" and the response, if any.
- Click Record notice.
The section's heading tells you for which meeting dates notice is still asked for.
Record a copy
- On the cycle page, click Record a copy.
- Choose "Recipient role": child, parent or caregiver.
- Fill in "Date the copy or summary was provided". Tick "A summary rather than the full plan" if so.
- For the child: tick whether the child reviewed the plan, fill in the date the child signed (or the date a refusal to sign was documented), and record any disagreement. The child can also draw a signature on the "Child — draw to sign" pad.
- If a copy was not provided, fill in the justification instead of a date.
- Click Record copy.
Fill in the review contents
- On a review's cycle page, click Review contents.
- Fill in items (1) to (7). Tick item (4) only where the review shows no progress, and then give the reasons.
- For a review completed before 08/10/2026, tick item (8) only if emergency behavior interventions were used, and then fill in its three parts. For a later review the item (8) boxes are gone (see below).
- Click Save review contents.
Item (10), the participants' names, is taken from the team list and is never retyped.
Emergency behavior interventions from 08/10/2026. The review's old EBI item stopped applying on 08/10/2026. Interventions are now recorded under EBI and looked at in triggered reviews and the annual evaluation (see EBI). 5C decides by the review's completed date or, before it is completed, by its other dates (scheduled meeting, then effective, then developed):
- Reviews from 08/10/2026. The "Review contents" form shows "Emergency behavior interventions since the last plan" instead of the boxes. It lists, from the EBI records, the interventions by type and the number of incidents and triggered reviews since the previous cycle, with Open EBI, and any incidents linked to this review. On the cycle page, item (8) says "This item was repealed on 08/10/2026." with the same figures. Nothing here can be typed.
- Answers typed earlier in the old boxes are kept and shown read-only under "Recorded earlier in the old EBI boxes (kept, read-only):". Nothing was deleted.
- Reviews before 08/10/2026 keep the item (8) boxes as before.
To link an incident to a review, choose the review in "Service-plan review" on the incident (see Record an incident).
Record a continued stay confirmation
- On the review's cycle page, click Record (or Record confirmation) beside "Continued stay confirmation".
- Fill in "Program Director" and "Confirmed on".
- Choose the "Document" on the child's Documents tab that holds the written confirmation. File it there first if needed.
- Fill in "Caseworker name" and "Copy to caseworker on".
- Click Record confirmation.
Edit the plan contents
What this is for: the contents of the one continuing plan. They are edited in place; earlier wording is kept in the change history.
- On the Service Plan tab, click Edit plan contents.
- Set "Service type". It decides which review cadence and team rules apply, so set it first.
- Fill in each section that applies: basis, needs identified in the admission assessment, relationships and goals, instructions to caregivers, age bands and high risk, outcomes and discharge, and the treatment-service sections where they apply.
- Click Save plan contents.
Participants, dates and signatures are not part of the contents; they are recorded on each cycle.
Record a decision not to review
- On the Service Plan tab, click Decision not to review.
- Fill in "Placement changed on", "Decided on" and "Reason".
- In "Approving service planning team members", list who approved it.
- Click Record decision not to review.
Preliminary service plans (older admissions)
The Service Plan tab marks preliminary service plans "Historical": the requirement was eliminated for admissions from 08/10/2026. For an earlier admission only:
- Click Record for an earlier admission.
- Choose the "Placement" and fill in "Admission date" and "Completed on".
- Fill in the immediate needs, and the five treatment items if they apply.
- Fill in the compatibility, notification and implementation dates, and the staff member's name and signed date. The staff member can also draw a signature.
- Click Record preliminary plan.
EBI tab
What this is for: the child's emergency behavior interventions: each incident, its follow-up steps, the running counts that start a triggered review, and the child's emergency medication orders.
The tab has Record an incident and Add a medication order. See The EBI tab on a child's record and Record an incident.
Home Visits tab
What this is for: the monthly contacts between child placement staff and the child.
The tab lists every contact with "Date", "Where", "Staff", "Management review" (the date it was reviewed, or a dash) and Open. A contact with a safety concern shows the concern's due date.
5C does not work out how often contacts are due. It records each contact's own date.
Record a monthly child contact
- On the Home Visits tab, click Record a contact.
- Under "1. Who / when / where", fill in "Visit date", "Time in", "Time out" and "Staff".
- Choose "This visit's location" (Foster home, School, Daycare, Other). For anything but the foster home, fill in "Other location / detail".
- Choose "Last month's location" (or First month — no previous contact).
- Choose "Child communicates".
- Under "2. Contact elements", answer each line Yes or No / n/a.
- Under "3. How the placement is working", write what you observed in "How the placement is working — what you observed". This is the most important part of the note.
- Fill in the topic boxes the child or caregiver raised: school, health, family contact, behaviors, anything else.
- Under safety, tick "No concerns this visit", or describe the concern, who was told, the next step and its "Due" date.
- Answer the two home items (poster visible, no new hazard).
- Fill in "Others present" and "Caseworker signed on". The caseworker can also draw a signature on the "Caseworker — draw to sign" pad.
- Tick "Filed in child's record" and, if it applies, "Home visit this month — also noted on home log".
- Click Record the contact.
Open, correct or review a contact
- On the Home Visits tab, click Open on the contact.
- Read the whole note on one page.
- To correct it, click Edit, change it and click Save changes.
- A manager who has reviewed the note clicks Record my review. 5C records your name and today's date and shows "Recorded your review of this note." The button disappears once a review is recorded.
Placements tab
What this is for: where the child has lived, each placement's dates, how each one ended, and the admission assessment and discharge or transfer summary that go with them.
The tab shows:
- Current placement — the home, type and start date, or "No open placement — this child is not currently placed."
- Add placement button.
- What this placement started — a summary card for the current (or most recent) placement: initial service plan, admission assessment, next service plan review, authorization on the start date, home visits and documents on file. Each line links to the tab it comes from. It is information only and has no buttons.
- Placement history — every placement with "Home", "Type", "Start", "End" and "Discharge reason", and the buttons End placement (open placement) and Edit.
- Admission assessments — one line per placement, with Write the assessment, or Read and Edit once one exists.
- Discharge / transfer summaries — one line per ended placement, with Write the summary, or Read and Edit.
Add a placement
- On the Placements tab, click Add placement.
- Choose "Home".
- Choose "Type", for example Foster Family Home or Kinship Home.
- Fill in "Start date" and, if there was one, "Pre-placement visit".
- Leave "End date (leave blank if current)" blank.
- Add "Notes" if useful.
- Click Add placement.
A placement with a start date in the future and no end date is a scheduled move; it becomes the current placement on its start date.
When a child moves, end the old placement and add the new one (see the next task).
End a placement
- On the Placements tab, click End placement on the open placement.
- Fill in the end date.
- Fill in "Discharge reason", in your own words.
- Choose "Was this move planned?": Planned or Unplanned. The help line explains which is which.
- Click End placement.
5C shows "Ended placement on … — …". The Discharge / transfer summaries list now offers Write the summary for that placement.
Correct a placement
- On the Placements tab, click Edit on the placement.
- Correct the home, type, dates, discharge reason or "Was this move planned?".
- Click Save changes.
Write an admission assessment
- On the Placements tab, under "Admission assessments", click Write the assessment for the placement.
- Fill in "Assessor" and "Assessment completed on".
- Work down the form: legal status and permanency goal, referral circumstances, records reviewed (tick each that applies), history, current medical status, mental and behavioral health, high-risk behaviors, supervision level, suicide risk screening, developmental, educational, social and family history, criminal history, strengths, CANS, identified needs, whether and how the agency can meet them, and planned services.
- Fill in "Reviewed with the caregivers on", "Given to the professional service providers on" and the supervisor review, when they happen.
- Click Record the assessment.
The form has a Read it as one page link. On the assessment's own page, Print prints it and Edit opens it again; when editing, the button is Save changes. The Placements tab shows how many days after the placement started it was completed.
Write a discharge or transfer summary
- End the placement first.
- Under "Discharge / transfer summaries", click Write the summary.
- Choose "Kind": Discharge — the child left the agency's care or Transfer — the child moved to another placement.
- Fill in the planning team member, circumstances, whether the child was told in advance and the child's response, services provided, current behaviors and needs, recommended services, appointments, transition resources and previous assessments.
- Record who went with the child, whether medications and belongings were provided, and who received the child.
- Fill in "Date the summary was provided to the receiver", "How it was provided" and "Prepared by".
- Click Record the summary.
Read and Print on the summary's page give the one-page version.
Documents tab
What this is for: filing and finding the child's documents.
To upload a document:
- On the Documents tab, under "Upload a document", choose the "File".
- Choose "Type" (for example Service Plan / CPOS, Court / Legal Document, Consent Form).
- Choose "Sensitivity": Normal or Sensitive.
- Fill in "Source" (who it came from) and "Document date", or leave the date blank for 5C to suggest one from the file name.
- Add "Notes (optional)".
- Click Upload.
The list "Documents on file" shows each file's name, type, date, source, size, sensitivity, and who uploaded it and when. Click the file name to download it. See Documents and uploads for file types, sizes and naming.
Only a supervisor can Delete a document (see Supervisors), and deleting cannot be undone. Other staff do not see Delete.
After Care tab
What this is for: the log of After Care contacts and attempts for a child discharged under a package or Add-On Service that carries Aftercare, and the monthly copy to the SSCC or DFPS.
For a child who is not on the After Care caseload, the tab says so and there is nothing to record.
At the top are "Discharge date", "Days since" and "Package at discharge".
To log a contact or attempt:
- Click Add contact or attempt.
- Fill in "Date".
- Choose "Kind": Contact (you reached somebody) or Attempt (you did not).
- Choose "Method". For Other, fill in "Other method".
- Fill in "With whom".
- Fill in "Notes" (required).
- Click Add to log.
To correct an entry, click Edit on it, change it and click Save changes. To take back an entry typed against the wrong child or entered twice, click Remove and confirm; any staff member can do this.
To record the monthly copy to the SSCC or DFPS caseworker:
- Under "Monthly copy to SSCC / DFPS", click Update.
- Fill in "Last copied on" and, optionally, "Note".
- Click Save.
Possible homes for a child
What this is for: a starting list of homes credentialed for the package the child is authorized for, and how many children each already has. It decides nothing and writes nothing.
- On the child's record, click Possible homes.
- 5C fills "Service package" from the child's authorization for today. To ask about another package, choose it.
- Change "On date" if you want a different date.
- Click Ask.
The table lists "Home", "Region", "Credential window" and "Children placed on" that date. Click a home's name to open its credentials, or Placements tab to go back to the child and record a placement. Click Back to the record to return.
Placement endings still unmarked
What this is for: older placements that ended before 5C asked "Was this move planned?". Until each is marked, it counts as neither planned nor unplanned.
The page is at Placement endings still unmarked. You reach it from the discharge summary form (a link beside "Was this move planned?") or from the report review where such placements are mentioned.
- Optionally choose a "Reporting period" and click Filter.
- For each row, read the "Discharge reason, as written".
- Click Planned or Unplanned.
The row leaves the list. To change your answer later, edit the placement on the child's Placements tab.
Referrals
What this is for: logging each referral the agency receives, deciding it, recording the response, and reporting on referrals by package and for Rider 36.
Click Referrals in the menu.
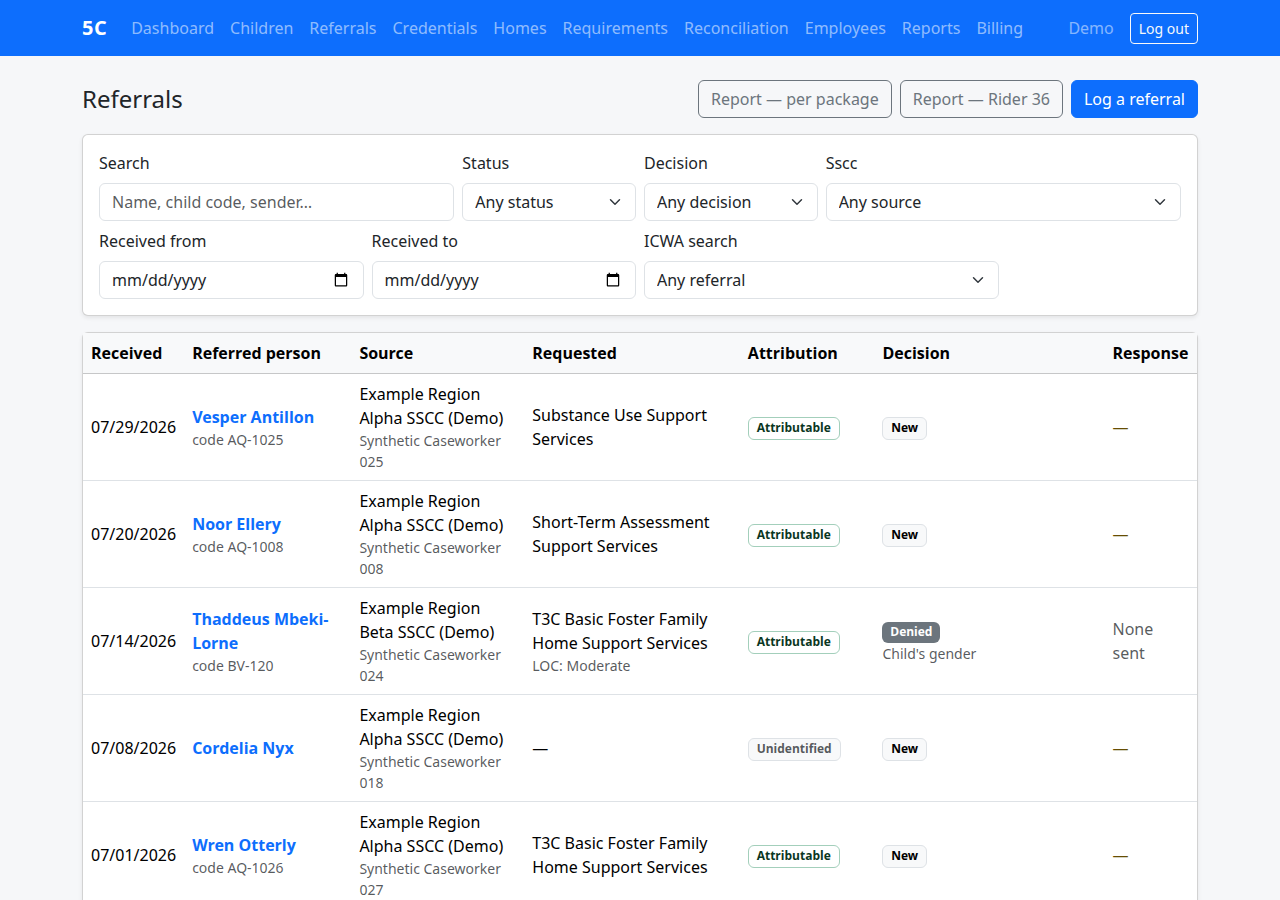
The Referrals list
- Buttons: Report — per package, Report — Rider 36 and Log a referral.
- Filters: "Search", "Status" (New, In review, Decided, Withdrawn by sender), "Decision" (Not yet decided, Accepted, Denied, No response sent), "Sscc", received from and to dates, and the ICWA search. The list updates as you change a filter.
- Columns: "Received", "Referred person", "Source", "Requested", "Attribution", "Decision" and "Response". A blast badge marks a referral that was sent to many providers at once.
- Click the referred person to open the referral.
Log a referral
- On the Referrals list, click Log a referral.
- Fill in "Received at" (date and time).
- Choose "Source type" (SSCC, DFPS or Other) and, for an SSCC, choose the "Sscc".
- Fill in the sender's name and email.
- Leave "Status" on New.
- Tick "Is blast" if the referral went to many providers.
- Tick the ICWA placement-preference search box if the referral asks for one.
- Fill in the referred child: name, external code, date of birth, and age, gender, race, ethnicity and tribal details as the referral gives them.
- Fill in what was requested: the package and level of care as written, "Placement needed by", and the "Requested package" if it names one.
- Fill in the history and needs sections that the referral covers: behaviors, medical, medications, substance use, education, court orders, interests, strengths and other considerations.
- Click Save.
The referral page
The referral page shows everything logged, plus:
- Edit — correct what was logged.
- Possible homes — homes credentialed for the requested package on a date you choose (On date, then Ask). It writes nothing.
- Link person — link the referral to a child already in 5C (choose in "Link to referral", then Confirm link). Use this when the same child is referred again.
- Decide — before a decision is recorded.
- Response — after a decision is recorded.
Decide a referral
- On the referral page, click Decide.
- Choose Accept, Deny or No admission.
- For Deny, tick every reason that applies.
- For No admission, choose "Why no admission": Accepted — child placed elsewhere, No response was made or Withdrawn by the sender.
- Check "Decided at".
- Add "Note (optional)".
- Click Save decision.
The decision is checked against the agency's credentials as they stood on the date the referral was received.
Accept a referral
What this is for: accepting a referral and connecting it to the child's record.
- On the referral page, click Decide and choose Accept.
- Click Save decision. 5C asks "Which child is this?".
- If the child is already in 5C, choose them from the list.
- Otherwise choose the new-child option and check "First name", "Middle name", "Last name" and the date of birth, which are filled in from the referral.
- Click Confirm and accept. (Click Back to return without accepting.)
Choosing the new-child option creates a child record. Check the list of existing children first: a duplicate child record is hard to undo.
Record the response
- On a decided referral, click Response.
- Under "Record the response", choose "Channel": Email, Phone or No response sent.
- Fill in "Sent at" and "What was sent".
- Click Save response.
The "Send it" box on the same page has a ready-made reply. Open in mail client opens it in your own email program, addressed to the sender only. It will not join the original email thread. 5C does not send email itself.
Referral report per package
- On the Referrals list, click Report — per package.
- Choose "From", "To" and "Source".
- Tick "Show unattributed" to include referrals not matched to a package.
- Tick "Internal view (ignore credential windows)" for an internal look that does not hold referrals to the credential dates.
- Click Apply.
Rider 36 report
- On the Referrals list, click Report — Rider 36.
- The page opens on the fiscal year to date. Change the dates if needed.
- Click Apply.
Credentials
What this is for: the agency's own T3C credential windows for each Service Package and Add-On Service, the Logic Model on file for each, and the SSCCs that send the agency referrals.
Click Credentials in the menu. The page is titled "T3C credentials". Staff can read it; only an administrator can add or change it. If the agency's care posture does not use T3C, new credentials are not offered.
Package credentials
Each Service Package shows its credential windows: level (Interim, Full or Inactive), dates and source note, and an Edit link (administrator).
To record a credential window (administrator):
- Under "Record a package credential", choose "Package" and "Level".
- Fill in "Effective from" and "Held until (blank = no end date)".
- Fill in "Source note", for example the HHSC letter's date.
- Click Add credential.
If a credential lapses or changes level, record a new window rather than editing the old one, so the history stays true.
Logic Models
Each package can carry its Logic Model (administrator):
- Under the package, choose the "Logic Model file".
- Fill in "Effective from" and "Next review by (blank = one year on)".
- Add "Notes" if useful.
- Click File Logic Model.
Add-On Service credentials
Under "Add-On Services", use "Record a credential window" the same way, and click Add Add-On credential (administrator).
SSCCs
The SSCC list is used on referrals.
- Under "SSCCs", fill in "Name".
- Fill in "Sending referrals since (blank = not on file)" and "Until (blank = still sending)".
- Optionally fill in "Regions served, if worth noting".
- Click Add (administrator).
Homes
What this is for: the agency's foster homes — their credentials, household, caregiver training, supervisory visits, annual evaluations, verifications, screening record, documents and closing or transfer summaries.
Click Homes in the menu.
The Foster homes list
- Buttons: Add home, Capability query and Expiring credentials.
- Warning boxes above the table name homes that need attention, for example a home with children placed whose credential has ended.
- Columns: "Home", "Region", "Credentialed today for", "Verified for" and "Children placed".
- Click a home's name to open it.
Add a home
- On the Foster homes list, click Add home.
- Fill in "Name" and "Region".
- Leave "Status" on Active.
- Click Save.
5C opens the new home. Next, record its verification date, household, training and credentials from the home's page.
Capability query
What this is for: which homes can take a given Service Package on a given date.
- On the Foster homes list, click Capability query.
- Choose "Service package" and "On date".
- Optionally choose "Status": Any, Credentialed, Credential expired, Not verified for the required Treatment Services or Not credentialed.
- Click Ask.
Expiring credentials
- On the Foster homes list, click Expiring credentials.
- Change "Horizon (days)" if you want something other than 90 days.
- Click Show.
Homes with children placed come first.
A home's page
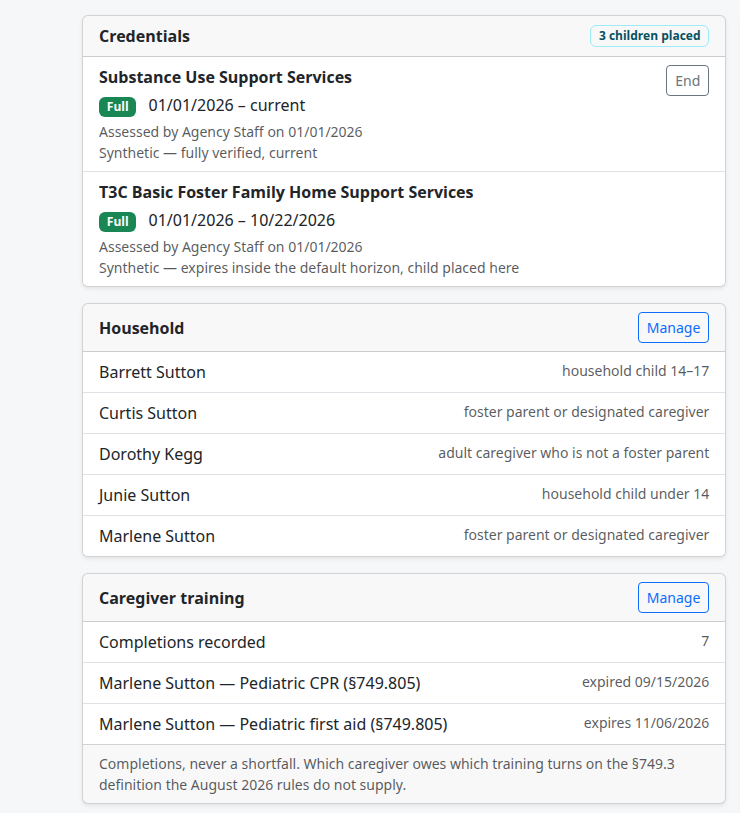
Clicking a home opens "… — T3C credentials". This page is the home's record. At the top are Edit (the name, region and status) and Documents.
Below are cards, each with a Manage link to its own page:
- Credentials — the home's credential windows per package, each with End (supervisor).
- Household — who lives in the home.
- Caregiver training — training the caregivers completed.
- Supervisory visits — the quarterly visits to the home.
- Annual evaluation — each year's evaluation.
- Closing / transfer summaries.
- Screening record — the home screening and its addenda.
- Home verification — the date the home was verified.
- Treatment Service verifications — which Treatment Services the home is verified for.
Each card says in a line what is on file and links to the page where it is kept.
Edit a home
- On the home's page, click Edit.
- Change the name, region or status. Set Inactive when the home closes.
- Click Save changes.
Credential a home for a package
What this is for: recording that the agency credentialed a home for a T3C Service Package (supervisor). Other staff see "Credentialing a home is a supervisor’s action." in place of the form.
- On the home's page, find "Credential this home for a package".
- Choose "Package" and "Level".
- Fill in "Effective from" and "Credentialed until (blank = no end date)".
- Choose "Assessed by" and fill in "Assessed on".
- Fill in "Source note".
- Click Add credential.
The box "The policy these decisions are made under" shows the agency's home credentialing policy text from the agency settings. A package marked "Not recorded" on the Requirements page cannot have homes credentialed for it until its required Treatment Services are recorded.
To end a credential (supervisor): click End on it, fill in "Credentialed until", and click End credential.
Verification and Treatment Services
- On the home's page, click Manage on "Home verification" or "Treatment Service verifications".
- To record the verification date (supervisor; other staff see "Recording the agency’s verification date is a supervisor’s action."): fill in "Verified on", choose "Verified by (management staff)", and optionally draw on the "Management staff verifying the home — draw to sign" pad. Click Record the verification date.
- To record a Treatment Service verification: choose "Treatment service", fill in "Verified from", "Verified until (blank = no end date)" and "Source note", and click Add Treatment Service verification.
Screening record
The screening page lists the initial screening and every addendum, each with a link to download the screening file if one was filed. Recording one is for supervisors; other staff see "Recording and approving a screening is a supervisor’s action.":
- On the home's page, click Manage on "Screening record".
- Choose "Kind": Initial screening or Addendum.
- Fill in "Completed on" and, for an addendum, "Change note".
- Choose "Authored by", and "Approved by (management staff)", and fill in "Approved on".
- Optionally the approving manager draws on the "Management staff approving — draw to sign" pad.
- Fill in "Source note" and optionally choose the file under "The screening (optional)".
- Click Record it.
The screening file is kept off the home's ordinary documents list and off the foster-parent portal.
Home documents
- On the home's page, click Documents.
- Under "File a document", choose the "File" and its "Type".
- Fill in "Document date", "Sensitivity", "Source entity" and "Notes" as needed.
- Click File it.
The list shows "Document", "Type" and "Dated". Click a document to download it. The Screenings link goes to the screening record. Only a supervisor can Remove a document, after confirming.
Household
What this is for: who lives in the home, from when, in what role, and their background-check status.
To add a member:
- On the home's page, click Manage on "Household".
- Under "Add a household member", fill in "Name, as the home's file has it" and "Relationship".
- Choose "Age band" and fill in "Age band recorded on".
- Choose "Caregiver role" and "Presence".
- Fill in "Joined on".
- Tick "CCR background checks confirmed conducted" when they are.
- Choose "Eligibility determination" and fill in "Eligibility determined on".
- Click Add to the household.
When someone leaves: under "In the household today", click Record a move-out on their row, fill in "Left the household on", and click Record the move-out. They stay in the household's history.
Caregiver training
- On the home's page, click Manage on "Caregiver training".
- Under "Record a completed training", choose "Who completed it" and the "Requirement".
- Fill in "Course title" and "Completed on".
- Fill in "Hours, if the certificate states them" and the certificate's expiry date, if any.
- If the certificate is already filed on the home, choose it in "Certificate already filed on this home".
- Click Record the training.
A certificate a foster parent files through the portal appears on the home's documents; staff still record the training here.
Supervisory visits
What this is for: the record of each quarterly supervisory visit to the home.
- On the home's page, click Manage on "Supervisory visits".
- Click Record a visit.
- Fill in "Visit date", the times and "Staff completing the visit".
- Choose "Visit type" (Announced or Unannounced) and "Location" (Inside the home or Somewhere else, with "Other location").
- Tick whether both foster parents and all household members were present, and fill in the table of who was there.
- Answer the changes questions (A, B and C) with notes, and write about the children (D).
- Work through the home-environment checklist: Not checked, Yes or No for each, with notes.
- Fill in the rules table, any deficiencies, the correction plan, follow-up and when the correction was verified.
- Record whether the screening changed, the topics covered and your observations.
- Fill in the foster parent's printed name and signed date, the second foster parent's, and "Child-placing staff signed on". Each can also draw a signature.
- Tick "Copy left with the foster parent(s)" if so.
- Click Record the visit.
The visits list shows each visit with Open. To correct one, open it, change it and click Save changes.
Annual evaluation
- On the home's page, click Manage on "Annual evaluation".
- Click Record an evaluation.
- Fill in "Evaluation date", "Verification anniversary", the period covered and the staff member.
- Tick "Also counts as the quarterly supervisory visit" if it does. Then "Inside the home (required if used as a supervisory visit)" must be ticked too.
- Work through the emergency-plan checklist, inspections, the training decision and any deficiencies.
- Fill in the signature lines (each can also be drawn).
- Click Record the evaluation.
An evaluation that also counts as a supervisory visit shows in the visits list, linked to it. To correct it, open it, change it and click Save changes.
Closing or transfer summary
- On the home's page, click Manage on "Closing / transfer summaries".
- Click Write a summary.
- Choose "Kind": Transfer or Closing.
- Fill in the dates: request received, home closed, "Licensing (CCR) notified on", "Summary completed on", and when it was forwarded.
- Fill in the requesting child-placing agency, certificate and address details, and the rest of the summary.
- Tick "Also mark this home Inactive in 5C" if the home is closing.
- Click Record the summary.
Edit and Print are on the summary's page. Edit home (status) is a shortcut to the home's Edit page.
EBI
What this is for: keeping the agency's log of emergency behavior interventions (restraints and emergency medication used in your foster homes): recording each one, working through the follow-up steps on time, holding triggered reviews, and producing the quarterly totals and the annual evaluation.
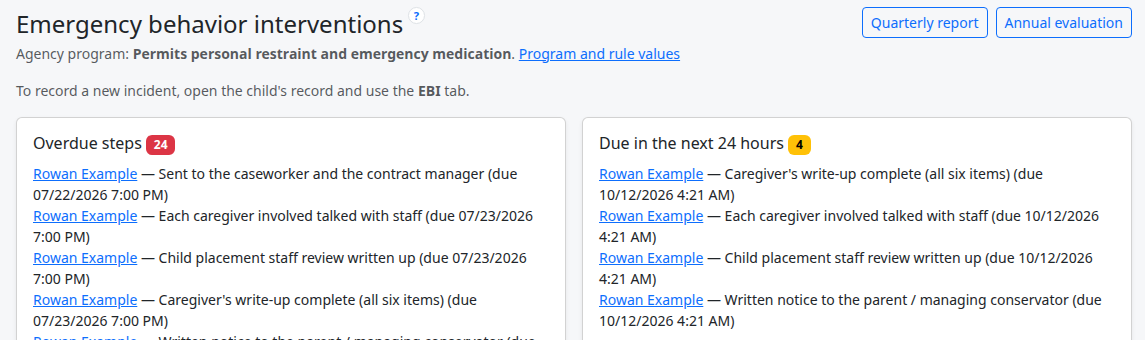
Click EBI in the menu. The page "Emergency behavior interventions" opens.
- Who uses it. Agency Staff record incidents from what the caregiver reports, and do the follow-up. Foster parents never enter an incident and never see this part of 5C. With passkey sign-in on, the administrator login does not open it either (the one exception is the program page, which its menu opens with EBI program; see The agency's EBI program setting).
- 5C sends nothing. Every follow-up step is a task with a due time. A person sends the notice or the report, then records it in 5C. 5C never files anything with Child Care Regulation or in CLASS.
- Under the heading is the agency's program setting, for example "Agency program: Permits personal restraint and emergency medication", with the link Program and rule values.
- Buttons at the top right: Quarterly report (see The quarterly report) and Annual evaluation (see The annual evaluation).
- Overdue steps and Due in the next 24 hours list follow-up steps for every child, each with the child's name and the due time. Click the child's name to open the incident.
- Triggered reviews not yet held lists each child with a review still to hold, and its due date. A red Mental health exam needed badge shows where one is needed.
- The incident list at the bottom has "When", "Child", "Home", "Status" and "Flags". Choose Open, Closed, Voided or All above it. A yellow Outside program badge means the incident was flagged (see The agency's EBI program setting); a red Injury badge means a substantial physical injury. Click Open on a row to open the incident. Click the home's name to see every incident in that home.
To record a new incident, open the child's record and use the EBI tab. There is no record button on this page.
Hover help. Almost every heading, box and step on the EBI pages has a small ? beside it. Rest the pointer on it (or move to it with the Tab key) to read what the box is for, what clock it starts, or why a count leaves something out. See Help text and hover notes.
The EBI tab on a child's record
What this is for: one child's incidents, follow-up, running counts and medication orders, in one place.
- Open the child's record.
- Click the EBI tab. "Loading EBI…" shows for a moment.
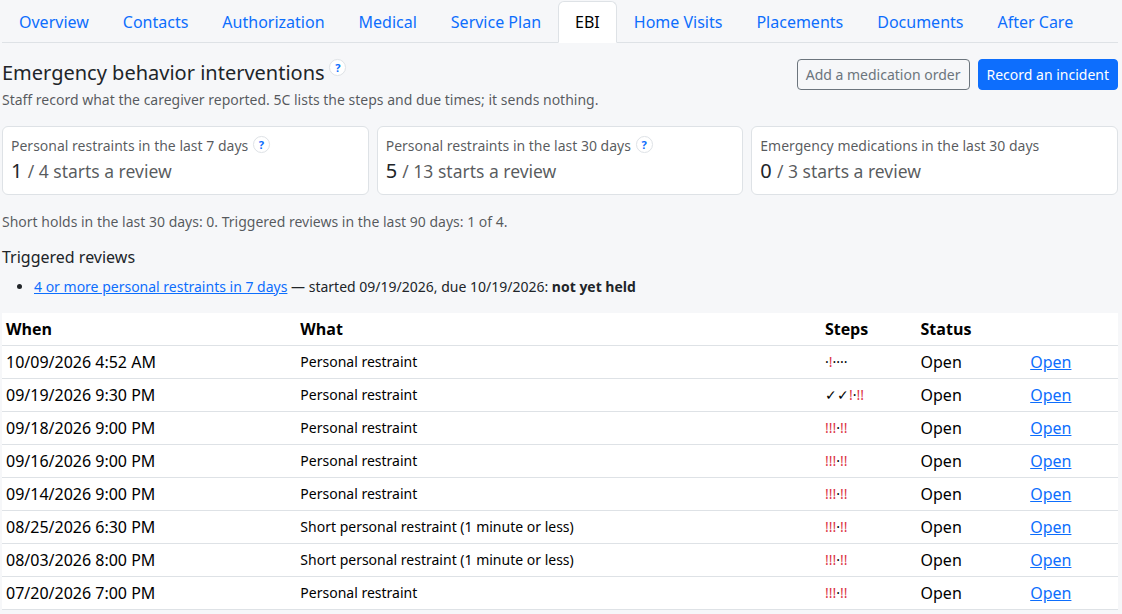
The tab shows:
- Add a medication order and Record an incident at the top right.
- Three running counts: "Personal restraints in the last 7 days", "Personal restraints in the last 30 days" and "Emergency medications in the last 30 days". Each shows how many there have been and how many start a review, for example "1 / 4 starts a review". A count near its limit is outlined yellow; a count at its limit is outlined red.
- Short holds in the last 30 days, and "Triggered reviews in the last 90 days: … of 4." When a mental health professional's exam is needed, a red Mental health professional exam needed badge shows instead.
- Triggered reviews — each review, when it started, when it is due, and whether it has been held.
- The incident list — "When", "What", "Steps", "Status" and Open. In "Steps", a tick is a step done, a red ! is a step overdue, and a dot is a step still to do.
- Emergency medication orders — the child's written orders, if any.
Record an incident
What this is for: writing down one emergency behavior intervention from what the caregiver reported. Staff do this; foster parents never enter one.
- Open the child's record and click the EBI tab.
- Click Record an incident. The page "Record an EBI incident" opens. The line under the heading repeats the agency's program setting.
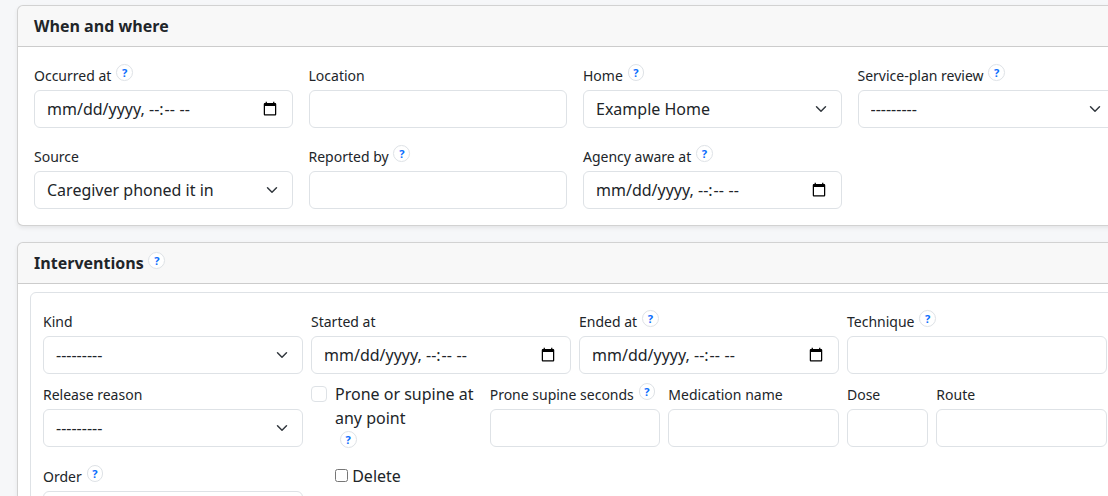
- Under "When and where", fill in "Occurred at". The follow-up clocks count from this time.
- Fill in "Location".
- Check "Home". 5C fills in the child's home from the placement; change it if the incident happened somewhere else, such as a respite home.
- Choose "Source", for example Caregiver phoned it in.
- Type the caregiver's name in "Reported by".
- If the agency heard about it later than it happened, fill in "Agency aware at". Leave it blank to use the time you save.
- Under "Interventions", use one row for each restraint and each dose of emergency medication. In "Kind", choose Personal restraint, Short personal restraint (1 minute or less) or Emergency medication.
- Fill in "Started at" and, for a restraint, "Ended at". 5C refuses a restraint with no end time, because the length is part of the record.
- For a restraint, fill in "Technique". As you type, 5C suggests the techniques listed in the agency's program; pick one, or type another if it is not on the list. Then choose "Release reason".
- If the child was face down or face up at any point, tick "Prone or supine at any point" and give the seconds in "Prone supine seconds".
- For emergency medication, fill in "Medication name", "Dose" and "Route", and choose the written "Order" it was given under (see Emergency medication orders).
- Fill in the six parts of the caregiver's write-up (listed below). Leave a box empty if you do not know yet.
- Tick "Possible prohibited or inappropriate use" if anyone says a technique that is not allowed was used, or that the intervention was not needed.
- Click Save incident.
5C opens the incident's page with "Incident saved. The follow-up steps are below." If no intervention row was filled in, a yellow message asks you to add one. Each form shows two empty intervention rows and three empty people rows; for more, save and then click Edit: empty rows come back each time.
The six parts of the write-up follow the numbered cards on the form:
- "1. Why, and what was tried first" — "Emergency basis" (Danger to the child, Danger to others or Both), "Why it was an emergency", "What was tried first" and "How the child reacted".
- The "Interventions" rows — what was used, by what technique, and for how long.
- "2–3. What happened, and who was there" — "What happened before", and one row per person: "Role" (Administered, Assisted, Adult witness or Child witness), then the person, chosen from "Household member" (the home's household) or "Employee", or typed in "Name". A child witness is a typed name only and is never linked to that child's record. For each caregiver, fill in "Talked with staff on" when they have talked it over with staff.
- "4. What the child was told would end it".
- "5. The child afterwards" — "Child's condition after", "Injury" (No injury, Minor injury or Substantial physical injury), "Medical care given" and "Injury detail".
- "6. Talking it over, and getting back to normal" — "Talk with the child afterwards", "Return to normal activities", "Witness debrief" (whether the children who saw it were talked with) with a note, and "The child's own comments".
Fixing an incident. While an incident is open, Edit on its page reopens the form. A closed or voided incident cannot be edited until a supervisor reopens it.
The incident page shows, from top to bottom: the follow-up steps, the "Interventions" and "The caregiver's write-up", and on the right "People", "Training check" and "Supervisor".
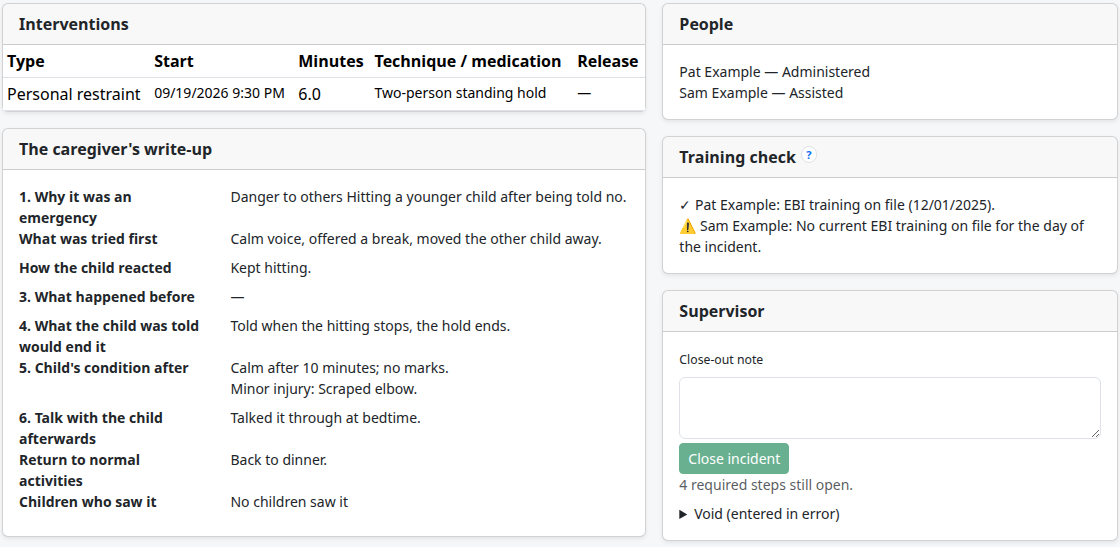
A yellow "Flagged" box lists anything outside the agency's program (nothing was refused). A red line shows when the incident is part of a triggered review. An incident from before 08/10/2026 says so in a blue note.
Emergency medication orders
What this is for: keeping the child's written physician or psychiatrist orders for emergency medication, so each dose can be linked to its order.
- On the child's EBI tab, click Add a medication order.
- Choose "Kind".
- Fill in "Ordered by" and "Ordered on".
- In "Allows", type what the order allows: the medication, the dose and when.
- Fill in "Max per 30 days" if the order sets a limit, and "Effective to" if it ends.
- Fill in "Given to parent on" and "Given to caregivers on".
- Click Save.
File the scanned order on the child's Documents tab. A dose with no order linked adds the step "Written order on file for the medication" and is flagged. A dose beyond the order's limit in 30 days starts a triggered review.
Follow-up steps and due times
What this is for: working through what has to happen after an incident, and recording when each thing was done.
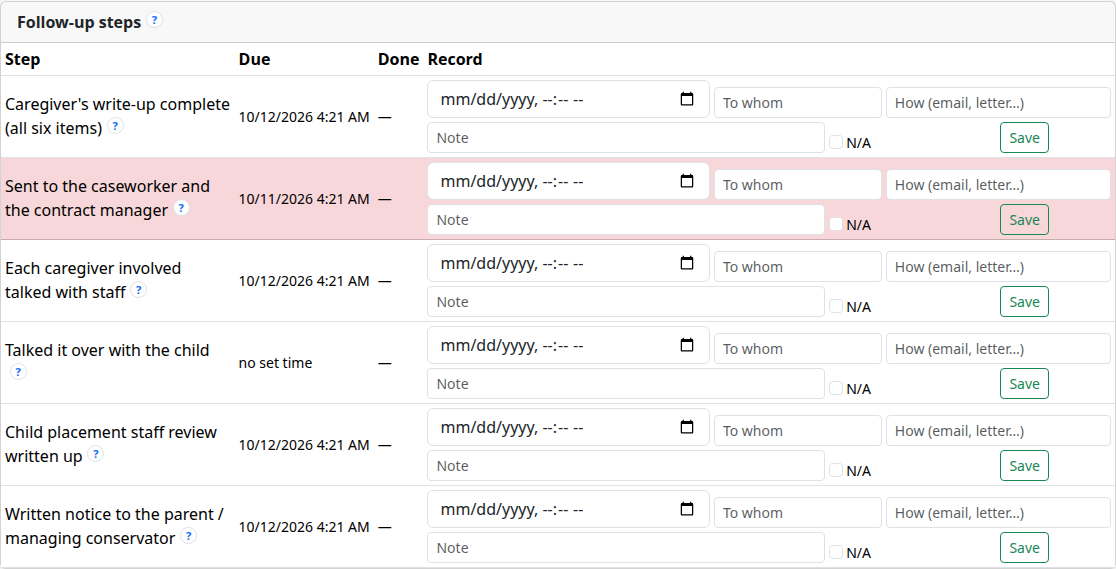
When you save an incident, 5C lists its steps at the top of the incident page. Unless noted, each clock counts from the time in "Occurred at":
| Step (as on screen) | Due |
|---|---|
| "Caregiver's write-up complete (all six items)" | 72 hours |
| "Sent to the caseworker and the contract manager" | 48 hours. For a child in DFPS care; mark it not applicable for a child who isn't. |
| "Each caregiver involved talked with staff" | 72 hours |
| "Talked it over with the child" | No set time ("no set time") |
| "Child placement staff review written up" | 72 hours |
| "Written notice to the parent / managing conservator" | 72 hours. For a child in DFPS care, the notice goes to the caseworker. See The printable notice. |
Some incidents add a step:
- "Written order on file for the medication" (no set time) — emergency medication with no written order linked.
- "Serious incident: report the injury" (24 hours) — a substantial physical injury. Report it to Child Care Regulation and tell the parents; 5C does not file it.
- "Decide whether a serious-incident report is needed" (24 hours from when the agency first heard, "Agency aware at") — when "Possible prohibited or inappropriate use" is ticked or the incident is flagged. Being outside the program is not always a reportable matter: decide, and note why.
To record a step:
- Open the incident (from the child's EBI tab, or from the lists on the EBI page).
- On the step's row, fill in the date and time it was done. Leave it empty to use the time you save.
- Fill in "To whom" and "How (email, letter…)" where it applies.
- Add a "Note" if useful.
- Click Save on that row.
If the step does not apply, tick "N/A" and say why in "Note" instead; 5C refuses "N/A" without a note ("Say why it doesn't apply."). A done step turns green. An overdue step turns red. A step done after its due time keeps a yellow late badge. Steps can be changed only while the incident is open.
Overdue steps and steps due within 24 hours also appear on the EBI page and on the Dashboard under EBI follow-up steps due.
An incident with short holds only. Its steps show a grey recommended badge instead of being required: they do not stop a supervisor closing the incident, and they do not appear in the overdue lists. Not settled yet: whether these steps should be recommended rather than required after a short hold alone is waiting for the agency's review. See Things this manual could not confirm.
The printable notice
What this is for: a written notice of the intervention for the parent or managing conservator. For a child in DFPS care, it goes to the caseworker.
- Open the incident.
- Click Printable notice at the top right.
- Check the notice. It shows the agency's name, "Notice of emergency behavior intervention", the child, the date, time and place, "What was used" (each restraint with its minutes, or each medication with its dose), "Why", how the child was afterwards with any injury and medical care, and a line to sign and date.
- Click Print, or copy the text.
- Send it yourself.
- Click Back to the incident.
- Record the step "Written notice to the parent / managing conservator" (see Follow-up steps and due times).
- File a copy on the child's Documents tab.
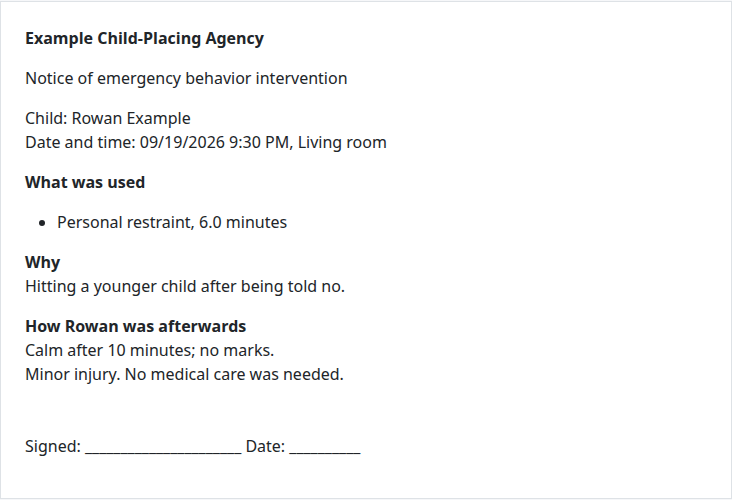
The notice is filled from the incident. To change what it says, edit the incident first.
Supervisor close, reopen and void
What this is for: a supervisor's sign-off when the follow-up is done, and putting right an incident closed too early or entered in error.
These are supervisor actions (see Supervisors). Other staff see "Closing or voiding an incident is a supervisor’s action." in the "Supervisor" card.
To close an incident:
- Open the incident.
- In the "Supervisor" card, type a "Close-out note" if useful.
- Click Close incident.
Close incident stays greyed out while any required step is still open; the card says how many. Finish each one, or mark it "N/A" with a note, first. A closed incident shows "Closed by … on …".
To reopen a closed or voided incident:
- Open the incident.
- Type the reason in "Reason to reopen". A reason is required.
- Click Reopen.
To void an incident entered in error:
- Open the incident.
- Click Void (entered in error) in the "Supervisor" card.
- Type the reason.
- Click Void.
A voided incident stays on file and is left out of every count and total. Each close, reopen and void is written to the security log as a supervisor action.
Triggered reviews and the mental health exam
What this is for: knowing when a child's placement, service plan and EBI orders must be reviewed because of how often interventions have been used, and recording that review.
5C starts a triggered review on its own when a child reaches one of these, counted from the interventions on file (voided incidents left out):
- "4 or more personal restraints in 7 days"
- "13 or more personal restraints in 30 days"
- "3 emergency medications in 30 days"
- "More often than a written order allows"
When you save the incident that crosses a limit, a yellow message says "Triggered review needed: …" with the due date. The review is due 30 days after it starts. Another intervention within the same window joins the review already started rather than starting a new one.
Short holds are left out of the two restraint counts. Not settled yet: whether short holds should count toward triggered reviews is waiting for the agency's review; for now they do not. See Things this manual could not confirm.
To record the review:
- On the child's EBI tab, under "Triggered reviews", click the review. (The EBI page lists reviews not yet held too.)
- Fill in "Held on".
- Tick "Child invited" if the child was invited.
- Choose the "Service-plan review" it was held with, if any.
- List the team members who took part in "Participants".
- Fill in "EBI records and orders reviewed", "Medical or psychiatric reasons not to use EBI", "Behaviors, patterns and what led up to them" and "Ways to prevent future EBI".
- Click Save review.
The mental health exam flag. When a child has had 4 triggered reviews within 90 days, the newest review is marked: a red Mental health professional exam needed badge shows on the child's EBI tab and the EBI page, and the review page says a mental health professional must examine the child and the agency follows the recommendations. The review form then also asks for "Mental health professional exam on", the recommendations, and how they were followed. The flag counts reviews, not incidents.
The training check
What this is for: a quick look at whether each caregiver who used a restraint or gave medication had current EBI training on file on the day.
The "Training check" card on the incident page lists each person with the role Administered or Assisted:
- a tick and "EBI training on file" with its date;
- a warning sign and "No current EBI training on file for the day of the incident.";
- a question mark and "Not on file, so 5C can't check their EBI training." for a typed name.
For a household member, 5C looks at the emergency behavior intervention training on the home's Caregiver training page (see Caregiver training). For an employee, it looks at the new employee EBI training in the employee's training rows. Training counts when it was completed on or before the day and had not expired. For an incident with short holds only, it says "Any caregiver may use a short hold."
The check only warns. It never stops you saving or closing an incident.
The quarterly report
What this is for: the agency's totals for each calendar quarter, to copy into CLASS. They must be filed in CLASS by the 15th day after the quarter ends. 5C does not file them.
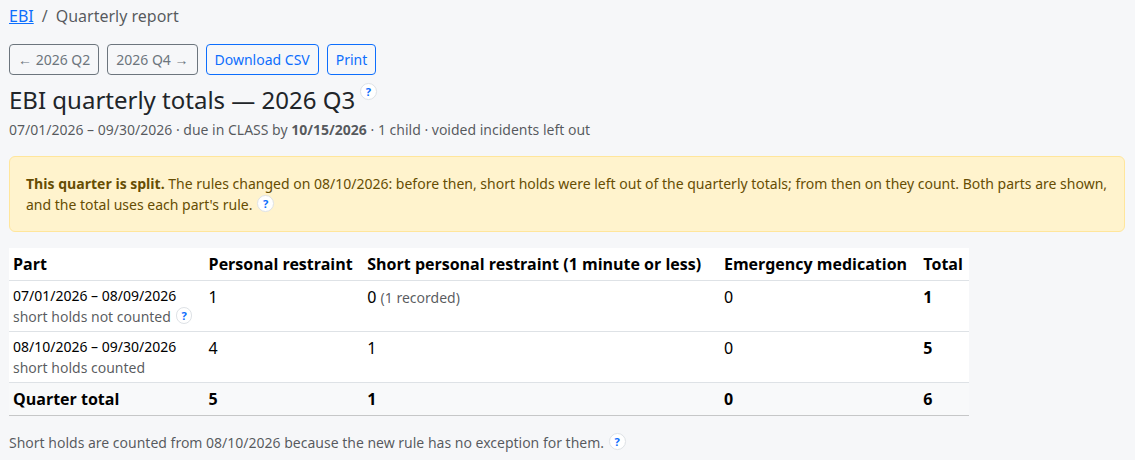
- Click EBI in the menu.
- Click Quarterly report. It opens on the quarter that most recently ended.
- To see another quarter, click the button with the arrow and the quarter's name, for example ← 2026 Q2.
- Read the heading line: the quarter's dates, "due in CLASS by" the date, how many children, and "voided incidents left out".
- Copy the totals into CLASS: "Personal restraint", "Short personal restraint (1 minute or less)", "Emergency medication" and "Total".
- Click Download CSV for a spreadsheet file, or Print for a paper copy.
- File the totals in CLASS.
- A supervisor then records the filing: under "Filing", fill in "Date filed in CLASS" and, if useful, a "Note".
- The supervisor clicks Record the filing.
Good to know:
- A quarter with no interventions is still reported. When nothing at all was recorded in the quarter, every total shows 0 and the page says "No interventions this quarter. File a zero report anyway." Record the filing as usual.
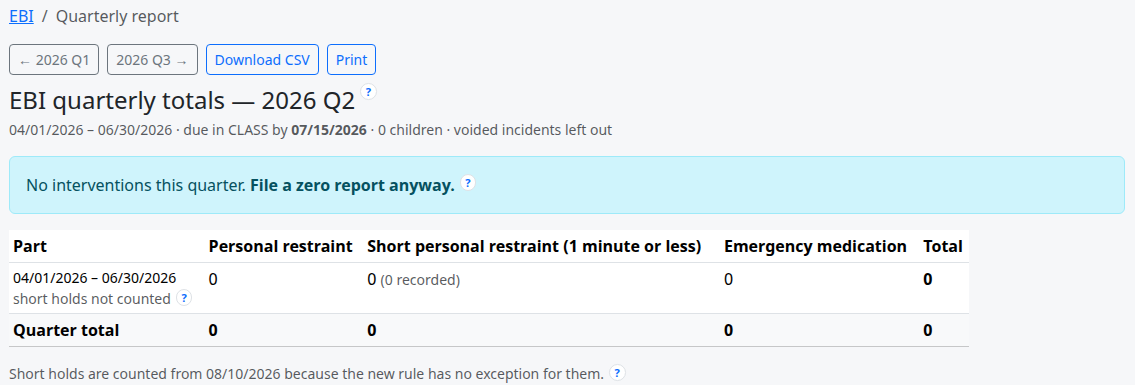
- 2026 Q3 is split. The rules changed on 08/10/2026. The page says "This quarter is split." and shows two parts: 07/01/2026 to 08/09/2026, when short holds were left out of the totals (5C shows how many were recorded), and 08/10/2026 to 09/30/2026, when they count. The quarter total uses each part's rule. If CLASS asks for one number, ask your Child Care Regulation representative how to file it.
- The recorded filing is kept as it was. The "Filing" card then shows "Filed in CLASS on …", who recorded it, and the total recorded. A later correction to an incident does not change what was recorded as filed. Each quarter is recorded once; a supervisor can correct it (below).
Correct a recorded filing. A supervisor can fix a filing recorded with the wrong date or note, or record that CLASS was refiled with new numbers:
- Open the quarter on the quarterly report.
- In the "Filing" card, click Correct this filing.
- Change "Date filed in CLASS" or the "Note".
- Tick "Replace the recorded numbers with today's" only if CLASS was refiled with corrected numbers. Leave it clear to keep the numbers recorded at the first filing.
- Type the reason in "Why the change". A reason is required. Keep it short: the history keeps its first 100 characters.
- Click Save the correction.
5C shows "Corrected the 2026 Q3 filing." (with the quarter's name). Without a date or a reason it refuses with "Not changed: give the date filed and a reason for the change." The first record is changed in place, never replaced: under it, Changes opens the history, one line per version, with when, who, the date filed, the total and the reason. Other staff see the filing but not Correct this filing. Each correction is written to the security log as a supervisor action.

The annual evaluation
What this is for: the agency's yearly written review of how EBI is used. 5C gives the figures; you write the review.
- Click EBI in the menu.
- Click Annual evaluation. It opens on this year. To see another year, click the button with the arrow and the year.
- Read the figures: "By type", "By quarter (as reported)" and "Other figures" (incidents, children, outside the program, with an injury, triggered reviews and techniques used).
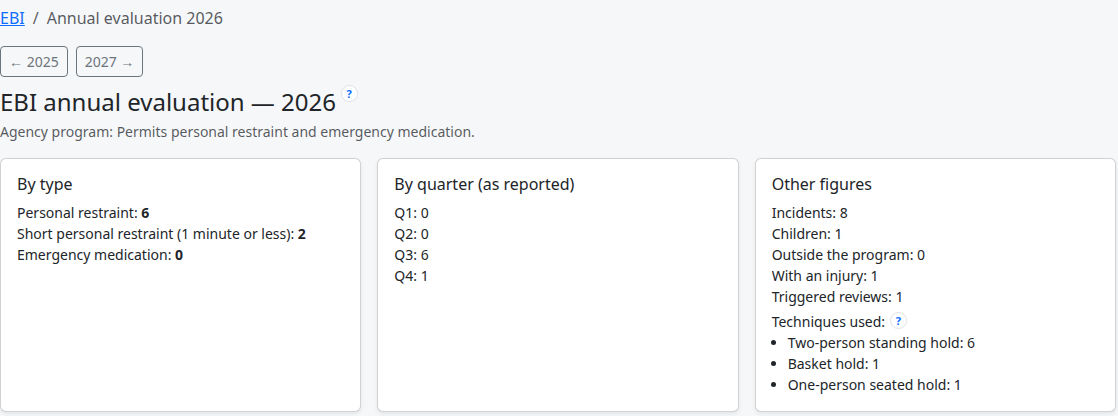
- Fill in "EBI policies, procedures, training policy and curriculum".
- Fill in "How often, patterns, and how well each type worked".
- Fill in "Ways to reduce specific types of EBI" and "Ways to reduce EBI overall".
- When the evaluation is finished, fill in "Completed on".
- Click Save evaluation.
Under "Techniques used", each technique is listed once, with the number of times it was used that year, most used first, for example "Two-person standing hold: 6". The same technique typed with different capitals or spacing is counted together and shown as it was first written.
The figures are saved with the evaluation each time you save it. Once "Completed on" is filled in, the page shows who completed it and when.
Requirements
What this is for: a read-only table of which Treatment Services each Service Package requires a home to be verified for.
Click Requirements in the menu. The table "Package → required Treatment Services" has "Package", "Required Treatment Services" and "Authored from". A package marked "Not recorded" has no requirement on file yet, and no home can be credentialed for it until an administrator records one on the admin side (Obligations → Package treatment requirements).
Reconciliation
What this is for: a single queue of authorizations that need following up.
Click Reconciliation in the menu. It has three lists:
- Requested, not yet received — pending authorizations, with how many days you have been waiting.
- Received document disagrees with our record — disputed periods, showing your record beside what the document says.
- In force, never confirmed by a Confirmation Report — active T3C periods with no matching Confirmation Report recorded.
Click a child to go to their Authorization tab and act there: record the authorization, reconcile the document, or settle the dispute. A child leaves the list when the matter is dealt with.
The Recommended vs Selected link opens a page of children whose Selected package has differed from the Recommended one for two or more cycles in a row. It is information only.
Employees
What this is for: a read-only roster of the agency's employees.
Click Employees in the menu. The table has "Name", "Primary post", "Additional posts", "Hired", "Employed" and "Login". With passkey sign-in off, an administrator also sees Manage in admin here, which opens the employee on the admin side. With it on, an administrator login does not open this page and goes to Accounts → Employees on the admin side instead (see Employees on the admin side).
Reports
What this is for: the DFPS Annual Credential Report and the agency's internal reports. Staff and administrator logins both open it; each sees only the links it can use.
Click Reports in the menu.
The Reports page
The page has two groups. What is in each depends on your login.
- DFPS Annual Credential Report
- Staff, and an administrator login when passkey sign-in is off, see Review and finalize runs. It opens Report runs.
- An administrator login sees Report periods and Report runs, which open on the admin side, and the Workforce extract card.
- The card says "Finalizing is a supervisor’s action" and that it cannot be undone. When passkey sign-in is off it adds "(or an administrator’s)".
- Internal — links to the referral report, the Rider 36 report, the After Care caseload, package credentials and homes, expiring home credentials and the Reconciliation queue. An administrator login also has the invoice register.
With passkey sign-in on, an administrator login has only the invoice register as a link under "Internal". The others are listed under "On your everyday staff login" because they show children's, homes' and referrals' records; open them from your staff login.
Report runs
What this is for: finding an Annual Credential Report run to review or finalize.
- Click Reports in the menu.
- Click Review and finalize runs. The page "Annual Credential Report runs" opens.
- Find the run. Each one shows its type (for example "Child-Placing Agency") and period, its status, when it was drafted and, once finalized, when.
- Click the run. Its review page opens (see Review an Annual Credential Report run).
A supervisor reads "As a supervisor you can finalize a reviewed run from its review screen." Other staff read "Finalizing is a supervisor’s action." With no runs yet, the page says "No runs yet. An administrator drafts a run from the admin site." Back to Reports returns to the Reports page.
With passkey sign-in on, this page opens on a staff login only.
Review an Annual Credential Report run
What this is for: checking every value of the report before it is filed.
- On the Reports page, click Review and finalize runs, then click the run (see Report runs). With passkey sign-in on, do this on a staff login.
- The page "T3C Annual Report — review manifest" opens. At the top are counts of values worked out by 5C, values a person must give, and values the software does not track.
- Each value has a badge: not yet checked, accepted, changed by a person, blank by decision, provisional or not on any page.
- For each value, click Accept if it is right.
- If it is wrong, click Change, type the right "Value" and the reason in "Why — required", and click Save change. (Cancel closes the box.)
- If the value should be left empty, click Leave blank on purpose.
- When you have been through the run, click Mark reviewed.
- A supervisor then clicks Finalize (see Supervisors). This cannot be undone. The button stays greyed out while any value is still outstanding. Other logins see "A supervisor finalizes." instead.
After finalizing, the page shows the "Filed snapshot" — what was filed, kept as it was.
Workforce extract
- On the Reports page, click Workforce extract. It opens on the admin side.
- Fill in "Period start" and "Period end".
- Click Compute.
The page shows the staff and foster-parent tables, each with a "Download … CSV" link for a spreadsheet file.
Billing
What this is for: monthly invoice registers worked out from placements, authorizations and rates. Administrators only.
Click Billing in the menu. It opens the Invoice months list on the admin side. To get back, click ← Back to 5C at the top of any admin page. It opens the Dashboard, or the Reports page when passkey sign-in is on.
Generate a draft register
- Choose the year and month.
- Click Generate a draft register.
The month appears with "Lines", "Billed", "Foster pass-through" and "Agency retainage", the care posture it was worked out under, and a "Register" column with links to its lines and to a CSV download. Generating again for a draft month replaces its lines.
Finalize a register
- Tick the month or months.
- Choose "Finalize the selected register(s) — this cannot be undone" in the action list.
- Click Go.
A finalized register can no longer be regenerated or changed.
Rates and respite
The amounts come from lists kept on the admin side under Billing:
- Placement rates — "Total daily rate" and "Foster pass through" for a placement.
- Add-on rates — rates for Add-On Services.
- Respite stays — the child, the primary placement, the mode, the dates, the respite home or placement, the caregiver's name and a note.
To add one, click Add beside the list, fill it in, and click Save.
Part 3 — The admin side
What this is for: the agency's settings, logins, employees, billing, data exports, the security log, and every record type in list form. Only logins with the Administrator role can open it. A staff or foster-parent login that tries gets the "isn't available to your account" page. Its front page also shows which version of 5C is installed; see Updating 5C.
With passkey sign-in on, an administrator login starts here after signing in, and Administration in the menu brings you back. To open the admin side otherwise, do one of these:
- Click Billing in the menu, then click Home in the line of links near the top of the page.
- Or type the 5C address followed by
/admin/in the browser's address bar (for example, if 5C is athttps://your-agency-5c.example, typehttps://your-agency-5c.example/admin/).
The admin side opens on its own page, titled "5C administration", with the heading "Agency configuration and user accounts". It looks different from the rest of 5C.
To leave the admin side, click ← Back to 5C at the top of any admin page. It opens the Dashboard, or, when passkey sign-in is on, the Reports page, because an administrator login then does not open the Dashboard. The button is on every admin page, so a click into Billing no longer strands you.
An address for an admin page opened before you have signed in takes you to the usual sign-in page first, then on to that admin page.
Finding your way on the admin side
- At the top of the front page, the "This installation" box shows the 5C version and whether the update check is on. See Updating 5C.
- The front page lists sections (for example Accounts, Agency, Authorizations, Billing, Obligations, Outward reports, Data portability), each with its lists of records. Accounts holds, among others, Account pairs, Employees, Security events and Users.
- Click a list's name to see its records. Most lists have a search box and filters on the right.
- Click a record to open it. Click Add (or the "Add …" button at the top right of a list) to make a new one.
- At the bottom of a record: Save, Save and add another, Save and continue editing, and Delete (red, on the left).
- History at the top right of a record shows every earlier version: who changed what, and when.
- The line of links across the top ("Home › …") takes you back one level at a time. To leave the admin side entirely, click ← Back to 5C at the top; it opens the Dashboard, or the Reports page when passkey sign-in is on. View site at the top right does the same.
- Add a passkey, at the top right beside View site, adds another passkey to your login. It shows only when passkey sign-in is on. See Add another passkey.
Most day-to-day work is done on the main screens. Use the admin side for the tasks in this part, and change other records there only when the main screens offer no way to.
The agency's EBI program setting is not on the admin side. With passkey sign-in on, EBI program in the menu opens it. See The agency's EBI program setting.
Users and roles
What this is for: giving a person a login, choosing their role, and stopping a login.
Create a login
- On the admin side, under Accounts, click Users.
- Click Add user.
- Fill in "Username".
- Choose "Role": Administrator, Agency Staff or Foster Parent.
- Tick "Supervisor" only for an Agency Staff login that approves and finalizes (see Supervisors).
- Leave "Password-based authentication" on Enabled.
- Type the password in "Password" and again in "Password confirmation". An administrator password must be at least 12 characters.
- Click Save. The user's full page opens.
- Fill in "First name", "Last name" and "Email address" if wanted.
- For a foster parent, choose "Home" in the "5C" section. For staff, leave "Home" empty.
- Click Save.
With passkey sign-in on, the person sets up their own passkey the first time they sign in. Until then the "Passkeys" line in the "Sign-in device" section says "None set up yet. The next sign-in asks for one."
For a staff member who is also an employee, it is simpler to create the login from the employee's record (see Employees on the admin side) and then set the role here.
The role alone decides what the person sees and whether they can open the admin side. "Staff status" follows the role automatically, so you do not need to tick it. "Superuser status" may be given only to an Administrator; 5C refuses it on any other role.
Change a role
- Under Accounts, click Users, then click the username.
- Change "Role" in the "5C" section. If the login is a supervisor and is no longer Agency Staff, untick "Supervisor" too; 5C refuses it on any other role.
- Click Save.
The change applies the next time the person opens a page. If you change a login to Administrator, also set it a new password of at least 12 characters: the old one is not checked again until it next changes.
Make a staff login a supervisor
What this is for: letting a staff login approve, finalize and remove records (see Supervisors).
- Under Accounts, click Users, then click the username.
- In the "5C" section, tick "Supervisor".
- Click Save.
To take it away, untick "Supervisor" and click Save. Only an Agency Staff login can be a supervisor: 5C refuses the tick on an administrator or foster-parent login. The Users list has a "Supervisor" column and a filter for it.
Set or reset a password
- Under Accounts, click Users, then click the username.
- Under "Password", click Reset password (or Set password if the login has none).
- Type the new password twice.
- Click Change password.
Give the person the new password in a safe way. Staff and foster parents cannot change their own password from the menu.
- Setting a password signs that login out everywhere it was open.
- An administrator password must be at least 12 characters.
- If the login is one of an account pair, its password must differ from the other login's. Otherwise 5C says "This is the password of this person's other login."
Reset someone's sign-in device
What this is for: letting a person who lost the computer, phone or key holding their passkey set up a new one.
- Under Accounts, click Users, then click the username.
- In the "Sign-in device" section, "Passkeys" shows how many the login has. Click Reset sign-in device….
- Read the page. The next sign-in on this login sets up the new passkey, so make sure the right person is the one who signs in next.
- In "Reason", type why, for example "laptop lost on 10/08, reported by phone". It is required.
- Click Reset sign-in device. (Cancel goes back without changing anything.)
5C says how many passkeys it removed and that the login was signed out everywhere. The reset and your reason go into the security log. Only an administrator can do this.
On your own login, only your other passkeys are removed; the one you signed in with stays. If it is your only one, 5C refuses: "You cannot reset your own last passkey. Add a second one first, or ask another administrator to reset your account." With no other administrator, see A backup passkey for a single administrator.
Stop a login
- Under Accounts, click Users, then click the username.
- Untick "Active".
- Click Save.
The person can no longer log in, and everything they recorded still shows their name. Prefer this to Delete.
Account pairs
What this is for: recording that an everyday staff login and an administrator login belong to the same person (see Administrator and staff logins).
- Make sure both logins exist: one with "Role" Agency Staff, one with Administrator, with different passwords.
- On the admin side, under Accounts, click Account pairs.
- Click Add account pair at the top right.
- Choose "Everyday (staff) login" and "Administrator login".
- Click Save.
Each login can be in only one pair. 5C refuses the same login on both sides, a staff side that is not Agency Staff, and an administrator side that is not Administrator. From then on, 5C refuses a new password on either login that is the same as the other's. Passwords the two logins already have are compared only when one of them next changes.
Security events
What this is for: seeing who signed in or failed to, who changed a password or passkey, who was reset, and who took a supervisor action.
- On the admin side, under Accounts, click Security events.
- Read the list, newest first: "Created at", "Event type", "Target username" (whose login it was about), "Actor username" (who did it), "Ip address" and "Reason".
- To narrow it, choose an event type in the filter on the right, type a username or word in the search box, or click a date along the top.
The event types are "Password set", "Password changed", "Password accepted", "Password refused", "Passkey accepted", "Passkey refused", "Passkey added", "Passkey removed", "Sign-in device reset by an administrator", "Sign-in device reset from the server command line", "Administrator login refused a casework page" and "Supervisor action". A reset from the server command line has no "Actor username"; its reason is kept.
Nobody can add, change or delete a security event. The log never holds a password or a passkey. A refused sign-in for a username that does not exist records no username.
A backup passkey for a single administrator
What this is for: making sure an agency with only one administrator login is not locked out if that login's passkey device is lost.
Only an administrator can reset a sign-in device from the screens, and nobody can reset their own last passkey. With one administrator login, a lost device would leave nobody able to reset it from the screens. A backup passkey is the first line of defense, so set one up now:
- Get a second device, for example a USB security key.
- Sign in with the administrator login, with its password and passkey.
- Click Add a passkey beside View site, and follow Add another passkey with the second device.
- Keep the second device somewhere safe, away from the first.
A second administrator login, held by another person, also gives the agency a way back.
Last resort, for whoever runs the computer 5C is on. If the only administrator has lost every passkey and nobody can sign in to the admin side, the person who looks after that computer can clear that login's passkeys there. In a terminal opened in the 5C folder, they type this line, with the login's username in place of <username> and the reason between the quotes:
docker compose --env-file .env.production -f docker-compose.prod.yml exec web python manage.py reset_sign_in_device <username> --reason "..."
It removes every passkey on that login and signs it out everywhere. The password stays the same. The reset and the reason go into the security log. At the next sign-in, the person types their password and sets up a new passkey (see Set up your passkey).
Foster-parent logins
What this is for: letting a foster parent use the portal for their own home.
- Create the login as in Create a login.
- Set "Role" to Foster Parent.
- Set "Home" to their foster home.
- Click Save.
A foster-parent login without a home sees a page saying it has not been linked yet, and nothing else. A foster parent only ever sees their own home. Each caregiver in a home can have their own login, all linked to the same home. With passkey sign-in on, foster parents set up a passkey too, and call the agency if their device is lost.
Agency settings and care posture
What this is for: the agency's name and license number, its care posture, and its home credentialing policy.
- On the admin side, under Agency, click Organizations, then click the agency.
- Check "Name" and "Hhsc ccr license number".
- Choose "Care posture": Legacy only, T3C only or Legacy and T3C. See Care posture.
- Write or update "Home credentialing policy". This text appears on each home's credential form.
- Set "Reassessment frequency days" and "Policy last reviewed".
- Click Save.
Changing the care posture changes which kinds of authorization, credential and billing line 5C accepts from then on. Records already saved are not changed.
The agency's EBI program setting
What this is for: telling 5C what the agency's written EBI program permits, so that anything outside it is flagged for a supervisor.
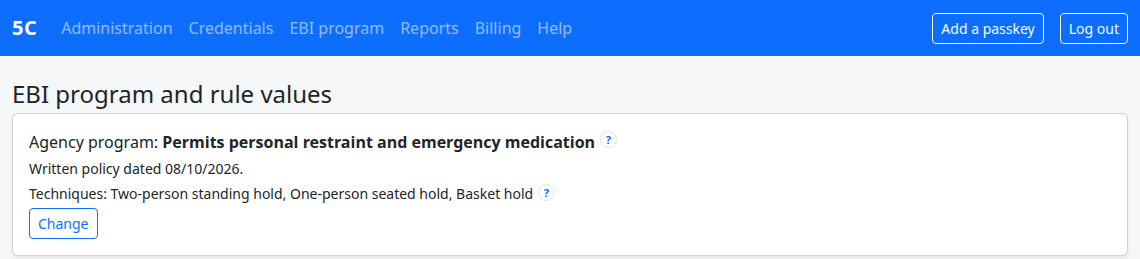
The setting is on the page "EBI program and rule values", not on the admin side. Only an administrator login can change it. Staff can read it, and see "An administrator changes this setting."
- Open the page. With passkey sign-in on, click EBI program in the administrator login's menu. With it off, click EBI in the menu, then Program and rule values. (Staff and supervisors reach the page the same way, from the EBI page.)
- Click Change. The page "The agency's EBI program" opens.
- In "Posture", choose Permits personal restraint and emergency medication, Short holds only or Prohibits restraint.
- In "Techniques", type the restraint techniques taught in the agency's EBI training, one per line. Staff are offered these as suggestions when they type the technique on an incident; they can still type any other.
- Fill in "Policy dated" with the date on the agency's written EBI policy.
- Add a "Note" if useful.
- Click Save.
5C shows "EBI program setting saved." A new agency starts on Permits personal restraint and emergency medication; each agency should set its own.
Anything outside the program is still logged. Staff can always record any intervention, whatever this setting says. 5C flags the incident instead of refusing it: a yellow "Flagged" box on the incident says why, the incident lists show an Outside program badge, and the step "Decide whether a serious-incident report is needed" is added. An incident is flagged when:
- the program is Prohibits restraint and any intervention was used;
- the program is Short holds only and anything other than a short hold was used;
- a short hold lasted more than one minute, or a personal restraint more than 30 minutes;
- a face-down or face-up hold is not shown as one minute or less;
- emergency medication has no written order linked.
Under the setting, the "Rule values" table lists the hours, counts and time windows 5C uses, with the dates each applies from. It is for reading only.
Employees on the admin side
What this is for: keeping each employee's posts, dates, login, training rows and personnel files.
The Employees menu item shows the read-only roster. To change an employee, click Manage in admin there, or on the admin side click Accounts → Employees.
Add an employee
- Under Accounts, click Employees, then click Add employee.
- Fill in "First name" and "Last name".
- Choose "Employee type" — the person's primary post.
- Fill in "Hired on". Leave "Ended on" blank.
- Tick "Acts as caregiver" if the employee also gives direct care.
- Add "Notes" if useful.
- To give them a login now, tick "Create a staff login for this employee" and fill in "Username" and "Password". Or choose an existing login in "User".
- Under additional posts, add any other posts they hold.
- Click Save.
A login created here is an Agency Staff login. For a person who also administers, keep it as their everyday login and give them a separate Administrator login, recorded as an account pair (see Account pairs).
The employee page also shows "What the rules name for these posts" and "Training dates & cycle (soft)": the training the employee's posts call for, and when it falls due. These are reminders only.
Record an employee's training
- Open the employee on the admin side.
- Scroll to the training rows and click to add another.
- Choose "Kind" and fill in "Completed on", "Hours" and "Course title". Fill in "Expires on" if the training expires.
- For an end-of-training test, fill in "Test signed on". The employee can also draw a signature on the "Employee — end-of-training test — draw to sign" pad.
- For the annual abuse, neglect and exploitation statement, fill in the period and "Ane statement signed on". The employee can also draw on the "Employee — ANE statement — draw to sign" pad.
- Tick "Proof on file" and add a "Proof note" saying where the proof is.
- Choose "Recorded by".
- Click Save.
To remove a row typed in error, tick its "Delete" box and click Save.
File a personnel document
- Open the employee on the admin side.
- Under "Personnel files", choose the "Type" and "File".
- Fill in "Source entity", "Document date" and "Sensitivity".
- Click Upload.
When an employee leaves
- Open the employee and fill in "Ended on".
- Click Save.
- Stop their login (see Stop a login).
Billing on the admin side
Billing lives entirely on the admin side. See Billing for generating and finalizing registers and for rates and respite stays.
Report periods and runs
The Outward reports section holds Report periods and Report runs, reached from the Reports page. Report periods are worked out by 5C and are not typed in.
Data export
What this is for: a full copy of the agency's records and documents in one package, for safekeeping or for moving to another system.
- On the admin side, under Data portability, click Export jobs.
- Click Start a full data export.
- The export runs in the background. Refresh the page to see its "Status" and "Progress".
- When it has finished, the "Output path" column shows where the finished file was saved on the server.
The screens have no download button for the export file. Ask whoever looks after the server to collect it. A finished export is not changed or removed from these screens. The "Documents" column marks an export in which some documents were missing or did not match.
The export includes the security log and each passkey's public part, which cannot be used to sign in. It never includes passwords: logins brought into another copy of 5C from an export cannot sign in until new passwords are set for them.
Updating 5C
What this is for: knowing when a newer version of 5C is out, and how the agency installs it.
How you are told. 5C checks once a day for updates and sends only your agency name and version number. The check runs quietly in the background when someone signed in opens a page; a computer with no internet connection simply never shows a message. When a newer version is out, administrator logins and supervisors see a blue strip under the menu on 5C's pages:
A 5C update is available (version …). What changed: … Run the update script when convenient. How to update.

- "What changed" is one short sentence about the new version.
- How to update opens this section.
- Click the × at the right to hide the message until tomorrow. It is hidden only in that browser, and comes back the next day while the update is still waiting.
- Other staff and foster parents never see it.
- On the admin side, administrator logins see the same message at the top of every admin page, including the front page, in the admin side's own style (yellow, or red when the version is no longer supported). There, click Hide until tomorrow at the end of the message instead of the ×. Hiding it on either side hides it on both, in that browser.
When your version is no longer supported. Each new version can say which is the oldest version still supported. If yours is older, the strip is red, and it cannot be hidden:
This version of 5C (…) is no longer supported. Please update now to version …. What changed: … Run the update script, or see how to update.

Plan the update soon. The message goes away once the newer version is installed.
5C never updates itself. Nothing changes until the agency runs the update script, at a time that suits it, for example after hours. The script saves a backup first, then installs the new version. The steps for each kind of computer, and what to do if an update goes wrong, are in the 5C install and update guide (the guide for a real install, not the demo one). Whoever runs the computer 5C is on follows that guide.
Which version is installed. On the admin side's front page, the "This installation" box shows the 5C version, for example "5C version 2026.10.11.", and whether the update check is on or off.
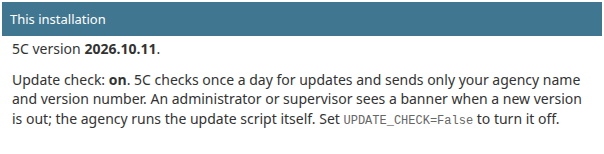
Turning the check off, for whoever runs the computer 5C is on. To stop the daily check and every update message, add the line UPDATE_CHECK=False to 5C's settings file in the 5C folder, then run the update script so the change takes effect. The "This installation" box then says the update check is off. The agency then has to find out about new versions some other way.
Two-step sign-in stays on. The update check can be turned off; two-step sign-in cannot. From this version, 5C will not start if its settings file turns two-step sign-in off on a copy that other computers can reach. If an update ends with 5C refusing to start for that reason, whoever runs the computer removes the line that turns it off from the settings file and runs the update script again.
Part 4 — The foster-parent portal
What this is for: foster parents see their own home's information, file certain documents, and see their household and training. A foster-parent login sees only these screens and only its own home.
The menu has My home, Documents, Household, Training and Help.
My home
The first page after logging in. It shows:
- counts of household members, documents on file, trainings recorded and certificates expiring soon;
- the home's verification date;
- the home's T3C credentials: "Service package", level, dates, and whether each is in force today.
Nothing can be changed on this page.
Documents (portal)
The page lists the home's documents with "Document", "What it is" and "Dated". Those the foster parent filed are marked "filed from here". The home's screening or home study and anything marked sensitive are not shown. Nothing can be removed from the portal; ask the agency if something was filed in error.
To file a document:
- Click Documents in the menu.
- Under "File something", choose the "File".
- Choose "What is it": Caregiver Training Certificate, Fire Inspection, Fire Safety Evaluation, Health Inspection, Environmental Health Checklist or Emergency Plan (and subsequent reviews).
- Fill in "Date on the document", or leave it blank. If blank, 5C guesses a date from the file name and marks it as estimated.
- Click File it.
The document appears at once on the home's documents for agency staff.
Under "Blank forms from the agency" are any blank forms your agency has added, to download and fill in. A form is listed only if the agency has added it. If it has added none, the list says "Your agency has not added any blank forms here yet."
Household (portal)
A read-only list of the household as the agency has it. If something is wrong, tell the agency; staff correct it on the home's Household page.
Training (portal)
For each caregiver: "Training", "Course", "Completed", "Expires" and "Hours", as the agency has recorded them.
Filing a certificate under Documents does not record the training. Agency staff read the certificate and record the training on the home's Caregiver training page.
Part 5 — Working with records
Documents and uploads
What this is for: how filing works everywhere in 5C.
- Where documents go. A child's documents are filed on the child's Documents tab (medical and dental reports also on the Medical tab). A home's documents are filed from the home's Documents page, and its screening on the Screening record page. Employees' personnel files are filed on the admin side. Foster parents file a set list of home documents through the portal.
- File types. PDF, PNG, JPG, TIFF and Word (DOCX), up to 50 MB.
- Names. 5C renames each file to a standard name built from the type and date. The original name is kept and shown as "Original: …".
- Document date. Leave it blank and 5C suggests one from the file name, marked as estimated. Type it to be sure.
- Sensitivity. Sensitive documents are kept off the foster-parent portal.
- Downloading. Click a document's name.
- Linking. Some forms let you choose a document already filed (for example a medication's "Related document", or the continued stay confirmation's "Document"). File it first, then choose it.
- Removing. Only a supervisor can delete a child's document or remove a home's document (see Supervisors). An employee's personnel file is removed only by an administrator, on the admin side. Deleting a child's document permanently removes the file and cannot be undone. If a document was simply filed under the wrong type or date, ask an administrator to correct it on the admin side instead.
Drawn signatures
What this is for: letting a person sign an existing sign-off line by drawing with a finger, stylus or mouse. It is an extra on lines that already have a name and date. It is not a notary and does not replace a wet signature where one is needed.
Sign-off lines with a drawing pad:
- Supervisory visit and annual evaluation — foster parent, second foster parent, child-placing staff.
- Monthly child contact — caseworker.
- Home verification — management staff verifying the home.
- Home screening — management staff approving.
- Service plan participant — the participant.
- Service plan copy — the child.
- Preliminary service plan — child placement staff.
- Employee training — end-of-training test and the ANE statement.
To sign:
- Fill in the name on the line first. A drawing on a line without a name is refused.
- Let the person read "I intend this mark to be my signature on this record."
- The person draws in the box. To start again, click Clear.
- Save the form as usual.
When saved with a drawing, the line's date is filled in with today's date. The saved line then shows "On file for this line" and "Drawn by …".
Good to know:
- An empty pad says "Nothing drawn." and saves nothing.
- A pad needs JavaScript in the browser. Without it, the pad says so and the typed date is used.
- If the record is edited after the mark was drawn, 5C says "The record has been edited since this mark was drawn, so the mark no longer matches what was signed." Ask the person to sign again.
- Drawing again adds a new mark. The earlier mark is kept.
Part 6 — Quick answers
How do I…
Each answer gives the short path and links to the full steps.
Children and placements
- …find a child? Children → type in the search box. The Children list
- …add a child? Children → Add child. Add a child
- …correct a child's name or date of birth? Child's record → Edit → Save. Edit a child's details
- …record where a child lives? Child's record → Placements → Add placement. Add a placement
- …move a child to another home? Placements → End placement on the old one, then Add placement. End a placement
- …schedule a move for next week? Add placement with a future start date and no end date. Add a placement
- …discharge a child? End the placement, then Edit → "Status" Discharged. Mark a child as discharged
- …find homes that could take a child? Child's record → Possible homes → Ask. Possible homes for a child
- …record the child's allergies? Child's record → Medical → Edit beside "Safety header". Medical tab
- …add a medication or record it stopped? Medical → Add medication, or Stopped on its row. Medical tab
- …add the caseworker or medical consenter? Contacts → Add case party. Contacts tab
- …add a parent or sibling? Contacts → Add person. Contacts tab
- …upload a court order or consent? Documents tab → "Upload a document". Documents tab
- …write the admission assessment? Placements → Write the assessment. Write an admission assessment
- …write a discharge summary? Placements → Write the summary. Write a discharge or transfer summary
- …mark old placement endings planned or unplanned? "Placement endings still unmarked" → Planned / Unplanned. Placement endings still unmarked
Authorizations
- …record a new T3C package? Authorization → Record T3C package. Record a T3C Service Package
- …record that we asked but have heard nothing? Authorization → Record as pending. Record an authorization as pending
- …check a Confirmation Report against our record? Reconcile on the period. Reconcile a received document
- …add an Add-On Service? Add-On on the T3C period. Add an Add-On Service
- …see which authorizations need chasing? Reconciliation in the menu. Reconciliation
Service plans and visits
- …record a service plan review? Service Plan → Record a cycle. Record a planning cycle
- …see what a cycle is still missing? Open the cycle → "Completeness" and "Shortfalls". The cycle page
- …have a participant sign? Cycle page → Add participant → draw on the pad. Add a team member
- …record a monthly contact with a child? Home Visits → Record a contact. Record a monthly child contact
- …record my supervisor review of a contact note? Open the note → Record my review. Open, correct or review a contact
- …log an After Care contact? After Care tab → Add contact or attempt. After Care tab
Referrals
- …log a referral? Referrals → Log a referral. Log a referral
- …accept or deny a referral? Referral page → Decide. Decide a referral
- …record our reply? Referral page → Response. Record the response
- …run the Rider 36 report? Referrals → Report — Rider 36. Rider 36 report
Homes
- …add a foster home? Homes → Add home. Add a home
- …credential a home for a package? Home's page → "Credential this home for a package". Credential a home
- …see which home credentials expire soon? Homes → Expiring credentials. Expiring credentials
- …add someone who moved into a home? Home → Household → "Add a household member". Household
- …record a caregiver's training? Home → Caregiver training. Caregiver training
- …record a quarterly supervisory visit? Home → Supervisory visits → Record a visit. Supervisory visits
- …close a home? Write a closing summary and tick "Also mark this home Inactive in 5C". Closing or transfer summary
Administration
- …give someone a login? Admin side → Users → Add user, then set "Role". Create a login
- …reset a forgotten password? Admin side → Users → the user → Reset password. Set or reset a password
- …give a foster parent the portal? Login with "Role" Foster Parent and "Home" set. Foster-parent logins
- …stop someone's access? Admin side → Users → untick "Active". Stop a login
- …change the care posture? Admin side → Organizations → "Care posture". Agency settings
- …record an employee's training? Admin side → Employees → the employee → training rows. Record an employee's training
- …make this month's invoice register? Billing → Generate a draft register. Generate a draft register
- …review the Annual Credential Report? Reports → Report runs. Review a run
- …export all our data? Admin side → Export jobs → Start a full data export. Data export
- …see who changed a record? Child's Overview tab, or History on the admin side. Change history
- …set up my passkey? Log in; 5C opens "Set up a passkey". Set up your passkey
- …get back in after losing my passkey device? Ask an administrator for Reset sign-in device. If you lose your passkey device
- …make someone a supervisor? Admin side → Users → the user → "Supervisor". Make a staff login a supervisor
- …see who signed in, or who was refused? Admin side → Security events. Security events
- …set what the agency's EBI program permits? EBI program in the menu (or EBI → Program and rule values) → Change (administrator login). The agency's EBI program setting
- …update 5C, or see which version we have? Admin side front page → "This installation"; whoever runs the computer runs the update script. Updating 5C
EBI
- …record a restraint or emergency medication? Child's record → EBI tab → Record an incident. Record an incident
- …tick off a follow-up step? Open the incident → fill in the step's row → Save. Follow-up steps and due times
- …print the notice for the parent or caseworker? Open the incident → Printable notice → Print. The printable notice
- …close an incident when the steps are done? Incident → "Supervisor" → Close incident (supervisor). Supervisor close, reopen and void
- …record a triggered review? Child's EBI tab → the review under "Triggered reviews" → Save review. Triggered reviews
- …get the numbers for CLASS? EBI → Quarterly report. The quarterly report
- …write the annual evaluation? EBI → Annual evaluation. The annual evaluation
- …correct a quarterly filing recorded wrongly? EBI → Quarterly report → the quarter → Correct this filing, with a reason (supervisor). The quarterly report
Fixing mistakes
What this is for: putting right something entered wrongly, and knowing which actions cannot be taken back.
Getting back
- Click Cancel on a form to leave without saving.
- Click Back to child, Back to the record or the home's name in the line of links at the top of a home's page to go back up.
- Click 5C at the far left of the menu to return to your dashboard (or My home in the portal).
- The browser's Back button works. If you go back to a form you already saved, do not save it again: it may record the same thing twice.
Correcting a record
Almost everything can be corrected with its Edit button. The old values are kept in the change history.
| Mistake | What to do |
|---|---|
| Wrong name, date of birth, PID or status on a child | Child's record → Edit. |
| Wrong placement dates or home | Placements → Edit on the placement. |
| Placement ended by mistake | Placements → Edit → clear the end date. |
| Wrong authorization dates | Ask an administrator to correct the period on the admin side (Authorizations → Authorization periods). |
| A document disagrees with an authorization | Reconcile, then correct or Settle. See Reconcile a received document. |
| Medication entered wrongly | Medical → Edit on the medication. |
| Monthly contact note wrong | Home Visits → Open → Edit. |
| After Care entry against the wrong child | After Care → Remove. |
| Contact or case-team member entered twice | Ask a supervisor to Remove the duplicate. |
| Household member's details wrong | Ask an administrator to correct it on the admin side. |
| Home credential ended by mistake | Ask an administrator to correct it on the admin side. |
| Document filed under the wrong type or date | Ask an administrator to correct it on the admin side rather than delete it. |
| Wrong value in a report run | Change with a reason. See Review a run. |
| EBI incident details wrong | While it is open: the incident → Edit. Once closed, ask a supervisor to Reopen it first. |
| EBI incident entered in error | Ask a supervisor to Void it, with a reason. It stays on file and is left out of every count. See Supervisor close, reopen and void. |
| EBI quarterly filing recorded with the wrong date or note, or refiled in CLASS | Ask a supervisor: the quarter → Correct this filing, with a reason. The history is kept. See The quarterly report. |
| A referral decided wrongly | Ask an administrator. If accepting it created a child by mistake, tell the administrator straight away. |
If a form will not save, look for red text under the boxes and at the top of the form. 5C says what is wrong; nothing was saved.
What cannot be undone
Think before doing these. 5C asks you to confirm most of them.
- Deleting a child's document (supervisor). The file is permanently removed.
- Finalizing an Annual Credential Report run (supervisor). The filed snapshot is fixed.
- Finalizing an invoice register (administrator). It can no longer be regenerated or changed.
- Accepting a referral as a new child. It creates a child record. Pick the existing child if there is one.
- Starting a data export. The screens offer no way to stop it once started.
- Deleting anything on the admin side. Use Delete only when you are sure. For logins, untick "Active" instead.
- Resetting a sign-in device. Every passkey on that login is removed; the person sets up a new one.
Things this manual could not confirm
The following were read from the screens' layout but not tried end to end, or depend on how the agency's copy is set up:
- How long you can stay idle before being logged out depends on your agency's setup.
- Taking a pending authorization off the waiting list is done on the admin side; the exact steps were not tried.
- How a new Annual Credential Report run's values are first filled in was not confirmed.
- Where the data export file is collected from depends on your server.
- The foster-parent portal was described from its screens' layout, not by logging in as a foster parent.
- 5C does not work out how often monthly contacts are due.
- How each browser, phone and computer shows its own passkey prompts (Windows Hello, Touch ID, a phone, a USB security key) was not tried. They differ from one to another.
EBI: not settled yet. These are waiting for the agency's review and may change:
- Whether short holds count toward triggered reviews. For now they do not: the two restraint counts leave them out (see Triggered reviews).
- Whether the follow-up after an incident with short holds only is recommended rather than required. For now its steps are marked recommended (see Follow-up steps and due times).
- How to file the split 2026 Q3 quarter if CLASS asks for one number. Ask your Child Care Regulation representative (see The quarterly report).
Part 7 — Glossary
Software words only.
Account pair — one person's everyday staff login and administrator login, recorded together. See Account pairs.
Add a passkey — the button beside Log out (a link beside View site on the admin side) that adds another passkey to your login. See Add another passkey.
Admin side — the administrators' area, titled "5C administration". See The admin side.
After Care caseload — discharged children shown on the After Care card and tab.
Badge — a small coloured label beside an item, such as Active or blast.
Care posture — the agency setting that says whether 5C works with legacy service levels, T3C packages, or both.
Card — a boxed area on a page, often with a count or a Manage link.
Caseload card — one of the All / Active / After Care / Discharged boxes on the Children list.
Change history — the list of earlier values kept for a record.
CLASS — the state's online licensing system where the agency files its quarterly EBI totals. 5C does not file there; see The quarterly report.
Clock — a date 5C works out (for example "Next SP review") and shows on the Children list.
Cycle — one initial service plan or one review and update, with its own page.
Dashboard — the first page after staff log in.
Draft register — an invoice register that has not been finalized and can be regenerated.
Drawing pad — the box where a person draws a signature on a sign-off line.
EBI — emergency behavior intervention: a personal restraint, a short hold or emergency medication. Also the menu item and the child's tab where they are logged. See EBI.
Filter — a choice that narrows a list.
Finalize — fix a report run or register so it can no longer change.
Help mark — the small marker you rest the pointer on to read an explanation.
Inline form — a form that opens inside the page when you click a button such as Add person.
Manage — the link on a home's card to the page where that part of the home's record is kept.
Managing conservator — the person or agency with legal custody of a child. For a child in DFPS care, the EBI notice for the parent or managing conservator goes to the caseworker. See The printable notice.
Minimum supported version — the oldest version of 5C still supported. Below it, administrators and supervisors see a red message that cannot be hidden. See Updating 5C.
Passkey — a lock kept by your computer, phone or USB security key that proves the device is yours. Used after your password. See Set up your passkey.
Passkey sign-in — two-step sign-in: a passkey after the password, with the administrator login kept out of casework. Always on in an agency's copy; it can't be turned off. Off only on the public tester copy and on a developer's own copy.
Pending — an authorization requested but not yet received.
Portal — the foster parents' screens: My home, Documents, Household, Training; their menu also has Help.
Role — what a login may do: Administrator, Agency Staff or Foster Parent.
Run — one Annual Credential Report for one period, with its values to review. Staff find runs under Reports → Review and finalize runs. See Report runs.
Security events — the log of sign-ins, password and passkey changes, resets and supervisor actions. See Security events.
Sensitive — a document setting that keeps it off the foster-parent portal.
Short hold — a personal restraint of one minute or less, shown on screen as "Short personal restraint (1 minute or less)". Recorded and counted in the quarterly totals; left out of the triggered-review counts for now. See EBI.
Shortfall — something a cycle is missing. It is named but never stops you saving.
Sign-in device — the computer, phone or key holding your passkey. Reset sign-in device removes a login's passkeys. See If you lose your passkey device.
Supervisor — an Agency Staff login marked to approve, finalize and remove records. See Supervisors.
Tab — one of the sections across a child's record, such as Medical.
This installation — the box at the top of the admin side's front page showing the 5C version and whether the update check is on. See Updating 5C.
Triggered review — a review of a child's placement, service plan and EBI orders that 5C starts when interventions reach a set number in a set time. Due within 30 days. See Triggered reviews.
Update — a newer version of 5C. 5C says when one is out; the agency installs it by running the update script, and 5C never updates itself. See Updating 5C.